
_
post
16 Jul 2022
 ryanmelt
I’m happy to announce the release of COSMOS 5.0.5!
This release updates dependencies, has some important bug fixes, and improves overall performance. It also simplifies the init container design down to a single init container.
If you are upgrading and already have a local compose.yaml file, then you will need to the init container services, like it is defined in the compose.yaml file in the release.
Docker - Running COSMOS 5 requires a working Docker installation. Typically Docker Desktop on Windows / Mac. Plain Docker or Podman also works on linux. We actively develop and run with Docker Desktop on Mac/Windows, and Linux on Raspberry Pi, so if you have any issues on another platform, please let us know by submitting a ticket!
Minimum Resources allocated to Docker: 4GB RAM, 1 CPU, 80GB Disk Recommended Resources allocated to Docker: 16GB RAM, 2+ CPUs, 100GB Disk
We will be actively updating documentation on https://ballaerospace.github.io/cosmos-website/ to capture all the details on COSMOS 5. So if it isn’t documented yet, we’re getting there! The biggest new documentation is on the new plugin system.
Please try it out and let us know what you think! Please submit any issues as Github tickets, or any generic feedback to COSMOS@ball.com.
Thanks!
Full Changelog: https://github.com/BallAerospace/COSMOS/compare/v5.0.4…v5.0.5
I’m happy to announce the release of COSMOS 5.0.4! This release updates dependencies, has some important bug fixes, and improves overall performance.
The most obvious change from this release is that the Redis process has been broken into two. We now run a cosmos-redis service and a cosmos-redis-ephemeral service. This allows us to configure Redis to only backup configuration data, and not streaming target data, greatly reducing the cost of redis persistence and greatly improving performance.
If you are upgrading and already have a local compose.yaml file, then you will need to manually add the cosmos-redis-ephemeral service, like it is defined in the compose.yaml file in the release.
Docker - Running COSMOS 5 requires a working Docker installation. Typically Docker Desktop on Windows / Mac. Plain Docker or Podman also works on linux. We actively develop and run with Docker Desktop on Mac/Windows, and Linux on Raspberry Pi, so if you have any issues on another platform, please let us know by submitting a ticket!
Minimum Resources allocated to Docker: 4GB RAM, 1 CPU, 80GB Disk Recommended Resources allocated to Docker: 16GB RAM, 2+ CPUs, 100GB Disk
We will be actively updating documentation on cosmosc2.com to capture all the details on COSMOS 5. So if it isn’t documented yet, we’re getting there! The biggest new documentation is on the new plugin system.
Please try it out and let us know what you think! Please submit any issues as Github tickets, or any generic feedback to COSMOS@ball.com.
Thanks!
Full Changelog: https://github.com/BallAerospace/COSMOS/compare/v5.0.3…v5.0.4
I’m happy to announce the release of COSMOS 5.0.3! This release updates dependencies, has a few bug fixes, and improves UI performance. Most importantly, the user interface better handles having many thousands of telemetry points. Everyone is encouraged to upgrade and start running off of the prebuilt containers on Docker Hub.
If upgrading from an earlier version, you will need to go the Admin -> Microservices tab and manually delete the DEFAULT__CLEANUP__S3 microservice.
Docker - Running COSMOS 5 requires a working Docker installation. Typically Docker Desktop on Windows / Mac. Plain Docker or Podman also works on linux. We actively develop and run with Docker Desktop on Mac/Windows, and Linux on Raspberry Pi, so if you have any issues on another platform, please let us know by submitting a ticket!
Minimum Resources allocated to Docker: 4GB RAM, 1 CPU, 80GB Disk Recommended Resources allocated to Docker: 16GB RAM, 2+ CPUs, 100GB Disk
We will be actively updating documentation on cosmosc2.com to capture all the details on COSMOS 5. So if it isn’t documented yet, we’re getting there! The biggest new documentation is on the new plugin system.
Please try it out and let us know what you think! Please submit any issues as Github tickets, or any generic feedback to COSMOS@ball.com.
Thanks!
Full Changelog: https://github.com/BallAerospace/COSMOS/compare/v5.0.2…v5.0.3
I’m happy to announce the release of COSMOS 5.0.2! This release brings new tools, lots of bug fixes, and a focus on stability. Everyone is encouraged to upgrade and start running off of the prebuilt containers on Docker Hub.
TableManager - Edit your binary configuration tables from COSMOS Autonomic (Beta) - Configurable Automation and Reactions Calendar (Beta) - Timeline now has a familiar calendar based interface and supports metadata entry
Tons of great stuff in this release, and it’s been far too long with 647 commits since the 5.0.1 release. Fortunately infrequent releases are over now that our unit test / integration test / and release process have been implemented into the Github Actions CI/CD pipeline.
Additionally we have changed from using Cypress for integration test to Playwright. With this our integration tests are now less flaky, and we are testing both Chrome and Firefox automatically.
We’ve also been doing a lot of development against an internal Git server, but will now be switching back to fully open development on Github to make maximum use of this CI/CD environment.
A full set of release artifacts is now being pushed for every release.
Docker - Running COSMOS 5 requires a working Docker installation. Typically Docker Desktop on Windows / Mac. Plain Docker or Podman also works on linux. We actively develop and run with Docker Desktop on Mac/Windows, and Linux on Raspberry Pi, so if you have any issues on another platform, please let us know by submitting a ticket!
Minimum Resources allocated to Docker: 4GB RAM, 1 CPU, 80GB Disk Recommended Resources allocated to Docker: 16GB RAM, 2+ CPUs, 100GB Disk
We will be actively updating documentation on cosmosc2.com to capture all the details on COSMOS 5. So if it isn’t documented yet, we’re getting there! The biggest new documentation is on the new plugin system.
Please try it out and let us know what you think! Please submit any issues as Github tickets, or any generic feedback to COSMOS@ball.com.
Thanks!
Full Changelog: https://github.com/BallAerospace/COSMOS/compare/v5.0.1…v5.0.2
COSMOS 4.5.2
This is primarily a bug fix release. All users are recommended to update. Please see the migration notes below for necessary changes when upgrading from 4.4.x.
To upgrade to the latest version of COSMOS, run “bundle update cosmos” in your COSMOS project folder.
Modify you system.txt files to:
This is the first patch release of COSMOS 5 Open Source Edition.
Docker - Running COSMOS 5 requires a working Docker installation. Typically Docker Desktop on Windows / Mac. Plain docker should work on linux. We’re currently only developing / running with Docker Desktop on Windows, so if you have any issues on another platform, please let us know by submitting a ticket!
Minimum Resources allocated to Docker: 8GB RAM, 1 CPU, 80GB Disk Recommended Resources allocated to Docker: 16GB RAM, 2+ CPUs, 100GB Disk
We will be actively updating documentation on cosmosc2.com to capture all the details on COSMOS 5. So if it isn’t documented yet, we’re getting there! The biggest new documentation is on the new plugin system.
Please try it out and let us know what you think! Please submit any issues as Github tickets, or any generic feedback to COSMOS@ball.com.
Thanks!
COSMOS 4.5.1
This is primarily a security and bug fix release. All users are recommended to update. Please see the migration notes below for necessary changes when upgrading from 4.4.x.
To upgrade to the latest version of COSMOS, run “bundle update cosmos” in your COSMOS project folder.
Modify you system.txt files to:
I am proud to announce the first production release of COSMOS 5.0.0 Open Source Edition!
COSMOS 5 is a highly-scalable, cloud-native, containerized, web-interfaced, command and control software system. This first production release is ready for general use.
Docker - Running COSMOS 5 requires a working Docker installation. Typically Docker Desktop on Windows / Mac. Plain docker should work on linux. We’re currently only developing / running with Docker Desktop on Windows, so if you have any issues on another platform, please let us know by submitting a ticket!
Minimum Resources allocated to Docker: 8GB RAM, 1 CPU, 80GB Disk Recommended Resources allocated to Docker: 16GB RAM, 2+ CPUs, 100GB Disk
We will be actively updating documentation on cosmosc2.com to capture all the details on COSMOS 5. So if it isn’t documented yet, we’re getting there! The biggest new documentation is on the new plugin system.
Please try it out and let us know what you think! Please submit any issues as Github tickets, or any generic feedback to COSMOS@ball.com.
Thanks!
I am proud to announce the release of COSMOS 5 Beta 2!
COSMOS 5 is a highly scalable, cloud native, command and control software system. This second beta release is intended for users to begin to experiment with and prepare for the production COSMOS 5 release scheduled for June.
Changes from the Beta 1 Release:
COSMOS 5 Technologies:
Functional versions of the following COSMOS tools are included in this release:
Known Things That Aren’t Done/Fully Working Yet:
Docker - Running COSMOS 5 requires a working Docker installation. Typically Docker Desktop on Windows / Mac. Plain docker should work on linux. We’re currently only developing / running with Docker Desktop on Windows, so if you have any issues on another platform, please let us know by submitting a ticket!
Minimum Resources allocated to Docker: 8GB RAM, 1 CPU, 80GB Disk Recommended Resources allocated to Docker: 16GB RAM, 2+ CPUs, 100GB Disk
We will be actively updating documentation on cosmosc2.com throughout the month of April. So if it isn’t documented yet, we’re getting there! The biggest new documentation is on the new plugin system.
Please try it out and let us know what you think! Please submit any issues as Github tickets.
Note that this release is not recommended for production use, but at this point you are encouraged to start migrating and working through any initial issues.
Thanks!
I am proud to announce the release of COSMOS 5 Beta 1!
COSMOS 5 is a highly scalable, cloud native, command and control software system. This is a beta release meant for COSMOS users to start experimenting with and providing feedback on the COSMOS 5 architecture and tools.
Changes from the Alpha 1 Release:
COSMOS 5 Technologies:
Functional versions of the following COSMOS tools are included in this release:
Known Things That Aren’t Done/Fully Working Yet:
Docker - Running COSMOS 5 requires a working Docker installation. Typically Docker Desktop on Windows / Mac. Plain docker should work on linux. We’re currently only developing / running with Docker Desktop on Windows, so if you have any issues on another platform, please let us know by submitting a ticket!
Minimum Resources allocated to Docker: 8GB RAM, 1 CPU, 80GB Disk Recommended Resources allocated to Docker: 16GB RAM, 2+ CPUs, 100GB Disk
We will be actively updating documentation on cosmosc2.com throughout the month of January. So if it isn’t documented yet, we’re getting there!
Please try it out and let us know what you think! Please submit any issues as Github tickets.
Note that this release is not recommended for production use. We will have a release candidate release in a few months.
Thanks!
COSMOS 4.5.0
This is a security and bug fix release. All users are recommended to update. Please see the migration notes below for necessary changes when upgrading from 4.4.x.
To upgrade to the latest version of COSMOS, run “bundle update cosmos” in your COSMOS project folder.
Modify you system.txt files to:
It’s been said that there are only two hard things in programming. I think a corollary to that is time is hard. So I wanted to write a post about some of the various things COSMOS does with time and what you need to be aware of.
If you’ve used COSMOS for a while you’ve noticed that COSMOS automatically creates several telemetry items on every packet: PACKET_TIMESECONDS, PACKET_TIMEFORMATTED, RECEIVED_COUNT, RECEIVED_TIMEFORMATTED, and RECEIVED_TIMESECONDS. While RECEIVED_COUNT is fairly self-explanatory (number of times the packet has been received) it might not be obvious why there are 4! ways to get the time.
So what’s the difference between RECEIVED_TIME vs PACKET_TIME. First of all they both have a TIMEFORMATTED and TIMESECONDS version. The formatted telemetry item returns the date and time in a YYYY/MM/DD HH:MM:SS.sss format in the local timezone. This is useful for human readable output like in Telemetry Extractor. They also can return TIMESECONDS which is the floating point UTC time in seconds from the Unix epoch.
RECEIVED_TIME is the time that COSMOS receives the packet. This is set by the interface which is connected to the target and is receiving the raw data. Once a packet has been created out of the raw data the time is set.
PACKET_TIME is a recent (4.3.0) concept introduced by a change to support stored telemetry. The Packet class has a new method called packet_time that by default simply returns the received time as set by COSMOS. But if you define a telemetry item called ‘PACKET_TIME’, that item will be used instead.
This was done to support processing ‘stored’ telemetry data which isn’t coming into COSMOS in real-time. Previously if you created an interface to process stored telemetry, COSMOS would set the received_time as fast as it processed the files and all your stored telemetry would effective have a timestamp of ‘now’. This would have also updated the current value table in COSMOS which affect scripts, screens, etc. With COSMOS 4.3.0 and later you can set the ‘stored’ flag in your interface and the current value table is unaffected. Also if you define a ‘PACKET_TIME’ item in your packet, this item will be used to calculate the time.
COSMOS provides a Unix time conversion class which returns a Ruby time object based on the number of seconds and (optionally) microseconds since the Unix epoch. Note: This returns a Ruby Time object and not a float or string!
  ITEM PACKET_TIME 0 0 DERIVED "Ruby time based on TIMESEC and TIMEUS"
    READ_CONVERSION unix_time_conversion.rb TIMESEC TIMEUS
Definining PACKET_TIME allows the PACKET_TIMESECONDS and PACKET_TIMEFORMATTED to be calculated against an internal Packet time rather than the time that COSMOS receives the packet.
If you have a question, find a bug, or want a feature please use our Github Issues.
I am proud to announce the release of COSMOS 5 Alpha 1!
COSMOS 5 is a highly scalable, cloud native, command and control software system. This is a technology preview release meant to introduce all of the new technologies debuting in COSMOS 5.
New Technologies:
Basic versions of the following COSMOS tools are included in this release:
Minimum Resources allocated to Docker: 4GB RAM, 1 CPU, 60GB Disk Recommended Resources allocated to Docker: 8GB RAM, 2+ CPUs, 100GB Disk
COSMOS goes through a multi-stage process to turn raw bits into identified Packets belonging to a target. Understanding these steps are helpful when writing your own custom interface.
The CmdTlmServer creates a new thread for each interface that was defined by the configuration text files. It calls connect() and then continuously calls the interface’s read() method which returns a packet. Typically the packets are unidentified meaning they don’t have an assigned target or packet name. At that point the interface thread loops through all the targets assigned to the interface to identify the packet. More on that later.
The implementation of the interface’s read() method first calls read_interface() which subclasses must implement to return raw data. Once it has the raw data, read_interface() should call read_interface_base(data) which updates internal counters. The read() method then loops through all the defined protocols for that interface which can add or subtract data and/or modify the packet. Ultimately a Packet instance is returned.
The packet identification process is implemented in System.telemetry.identify!(). The identify!() method loops through all the given targets looking to identify the data. There are two ways to identify a packet. The new way, which was implemented in COSMOS 4.4, utilizes a lookup hash which is created for each target. This requires that every packet in the target has the same ID_ITEMS (same type, size, location) defined for each packet which is generally good practice. If you have hundreds of small packets associated with a single target it’s especially important to utilize this new lookup method. The old identification method is still available if you put TLM_UNIQUE_ID_MODE in the target’s target.txt file. In this mode, each packet’s ID_ITEMS are read and individually checked for a match.
The implication of this process for custom interfaces is how and when packets are identified. If your custom interface can determine the target, you would want to identify the packet before returning it to save processing time. This may also be required if you map multiple targets to a single interface and have identification collisions. Identification collisions occur if two packets in different targets with the same ID_ITEMS are mapped to the same interface. In this case a custom interface would first have to properly identify the target and then override the read() method to identify the packet before returning it.
An example of a custom interface implementing this might look something like this:
require 'cosmos/interfaces/interface'
module Cosmos
  class MyInterface < Interface
    # ... various other methods

    def read_interface
      # Implement something to get the raw data and return it
      # ...
      # This is probably where you determine which target the data belongs to
      @target_name = "TARGETX"
      read_interface_base(data)
      return data
    end

    def read
      packet = super() # Ensure the base class implementation is called
      # Call the identify! method to identify the packet using the given target
      return System.telemetry.identify!(packet.buffer, [@target_name]).dup # Copy the identified packet before returning it
    end
  end
end
At this point the interface thread will receive an identified packet and can quickly update the current value table with the packet data.
If you have a question, find a bug, or want a feature please use our Github Issues.
Protocols were introduced into COSMOS in version 4.0.0 and were previously discussed in this post. We recently had a question at Ball about how to reduce the telemetry rate of a high speed target so I thought I would walk through the problem and solution.
One COSMOS server was connected to a high speed telemetry target that was generating telemetry at 10Hz. Another COSMOS server was chained to this and did not need this high speed data. How do you reduce the data rate coming into the chained server?
We can first model the chaining using the COSMOS demo. The format for the cmd_tlm_server.txt file is given in the chaining documentation and already exists in the COSMOS demo. The demo also includes a deconflicting port definition file in system_alt_ports.txt. To start the two server instances from the command line we can type:
ruby demo\tools\CmdTlmServer
And in another terminal start the chained server:
ruby demo\tools\CmdTlmServer --system system_alt_ports.txt --config cmd_tlm_server_chain.txt
Now we need to implement a custom protocol to slow down the telemetry rate on the chained server. Note that the built-in protocols are fully described on the Protocols page and also mentioned on the Interfaces page.
Let’s assume we want to slow down the INST ADCS packet which the demo generates at 10Hz. First create a new file called config/targets/INST/lib/drop_protocol.rb. This protocol will drop data until we get the rate we want. It looks like this:
require 'cosmos/interfaces/protocols/protocol'
module Cosmos
  # Limit a specific packet by dropping packets
  class DropProtocol < Protocol
    def initialize(target_name, packet_name, drop, allow_empty_data = nil)
      super(allow_empty_data)
      System.telemetry.packet(target_name, packet_name)
      @target_name = target_name
      @packet_name = packet_name
      @drop = drop.to_i
      @count = 0
    end

    def read_packet(packet)
      target_names = nil
      target_names = @interface.target_names if @interface
      identified_packet = System.telemetry.identify_and_define_packet(packet, target_names)
      if identified_packet
        if identified_packet.target_name == @target_name && identified_packet.packet_name == @packet_name
          if @count < @drop
            @count += 1
            STDOUT.puts "DROP count:#{@count}" # Debugging statement
            return :STOP
          else
            @count = 0
            STDOUT.puts "SEND" # Debugging statement
          end
        end
      end
      return super(packet)
    end
  end
end
The constructor takes the target and packet names as well as the number of packets to drop. The read_packet method first identifies the incoming packet and then determines if it is the packet we’re interested in. At that point I simply increment a counter until we get to the required number of drop packets and return :STOP to let COSMOS know not to return the packet. Once we want to actually send the packet we reset the counter and and simply fall through to super(packet).
Note I included some debugging lines to show how you can debug your own custom protocols. When you run the CmdTlmServer from the command line the STDOUT.puts will write to the terminal output.
Now we can add this protocol to the cmd_tlm_server_chain.txt definition as follows:
INTERFACE CHAININT tcpip_client_interface.rb localhost 7779 7779 10 5 PREIDENTIFIED
  TARGET INST
  TARGET INST2
  TARGET EXAMPLE
  TARGET TEMPLATED
  TARGET SYSTEM
  TARGET DART
  PROTOCOL READ DropProtocol INST ADCS 9 # Drop 9 ADCS packets to force 1Hz
Finally stop and relaunch the chained server:
ruby demo\tools\CmdTlmServer --system system_alt_ports.txt --config cmd_tlm_server_chain.txt
You should now see the following in your terminal output:
DROP count:1
DROP count:2
DROP count:3
DROP count:4
DROP count:5
DROP count:6
DROP count:7
DROP count:8
DROP count:9
SEND
DROP count:1
DROP count:2
DROP count:3
DROP count:4
DROP count:5
DROP count:6
DROP count:7
DROP count:8
DROP count:9
SEND
And the server “Tlm Packets” tab should show the ADCS count incrementing at 1Hz.
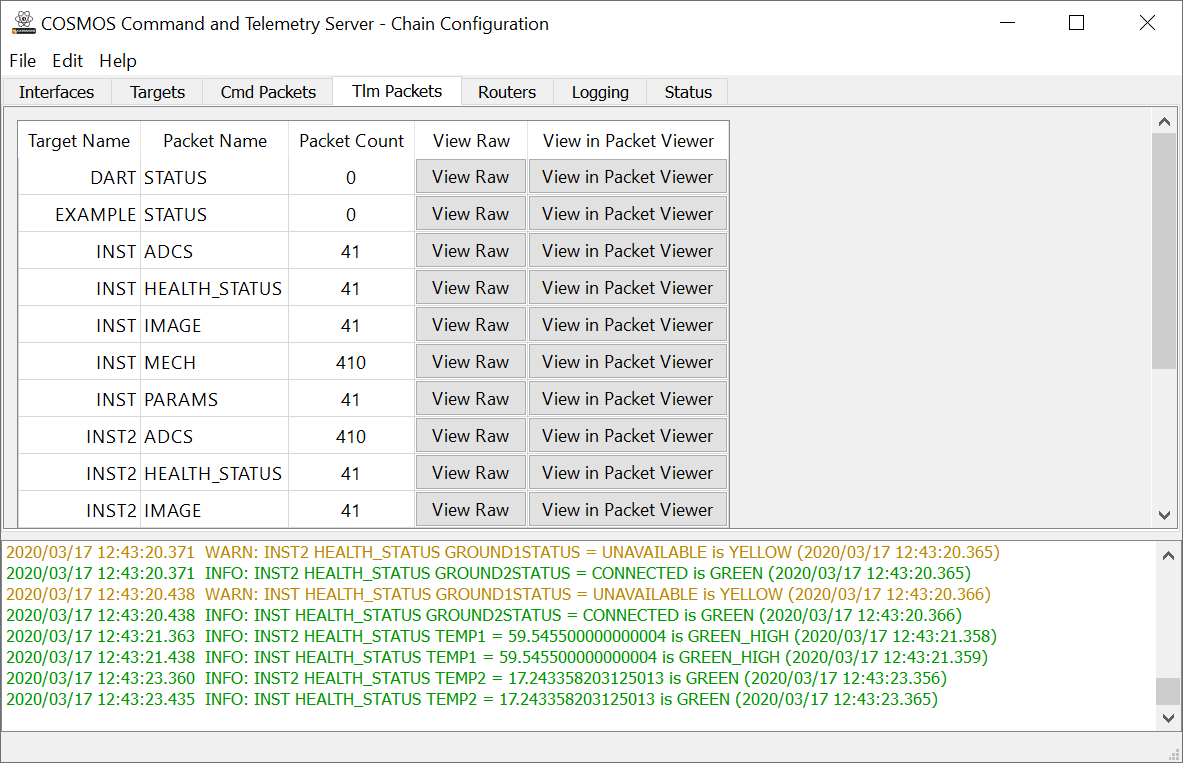
Chained Server Tlm Packets tab
This protocol is extremely simple but it accomplishes the task at hand. Remember protocols can be layered and operate in order so keeping them simple helps with debugging and reusability.
For example, to also reduce the rate of INST2 ADCS you’d simply add another PROTOCOL line to the cmd_tlm_server_chain.txt file:
INTERFACE CHAININT tcpip_client_interface.rb localhost 7779 7779 10 5 PREIDENTIFIED
  TARGET INST
  TARGET INST2
  TARGET EXAMPLE
  TARGET TEMPLATED
  TARGET SYSTEM
  TARGET DART
  PROTOCOL READ DropProtocol INST ADCS 9 # Drop 9 ADCS packets to force 1Hz
  PROTOCOL READ DropProtocol INST2 ADCS 9 # Drop 9 ADCS packets to force 1Hz
If you have a question, find a bug, or want a feature please use our Github Issues.
COSMOS 4.4.2! A minor bug fix release.
Enjoy and see below for the full list of changes.
None
To upgrade to the latest version of COSMOS, run “bundle update cosmos” in your COSMOS project folder.
The faster identification in ticket #911 does come with a potentially breaking change. The improvement requires that all packets for a given target be identified using the same fields (bit offset, bit_size, and type). This is the typical configuration, and breaking this pattern is typically a dangerous/bad choice for interfaces anyways, but previously COSMOS did default to handling packets being potentially identified using different fields in the same target. If you have a target that still requires that functionality, you need to declare CMD_UNIQUE_ID_MODE, and/or TLM_UNIQUE_ID_MODE in the target’s target.txt file to indicate it should use the slower identification method.
See the COSMOS documentation for directions on setting up DART: http://cosmosc2.com/docs/v4/
Onward to COSMOS 4.4.1! 27 tickets have been incorporated including 6 new features, 13 bug fixes and 8 general maintenance changes.
Mainly a stability bug fix release, but there are a few cool changes. There is an new keyword for marking that bit overlaps are intentional in packet definition files. This can get rid of those annoying warnings when you do this intentionally. There is also a new DELETE_ITEM keyword to get rid of items potentially added by auto generation. Tlm Extractor and Tlm Grapher can now pull more than 10,000 data points from DART. Also, there is now the ability to package multiple targets into one gem.
Enjoy and see below for the full list of changes.
To upgrade to the latest version of COSMOS, run “bundle update cosmos” in your COSMOS project folder.
The faster identification in ticket #911 does come with a potentially breaking change. The improvement requires that all packets for a given target be identified using the same fields (bit offset, bit_size, and type). This is the typical configuration, and breaking this pattern is typically a dangerous/bad choice for interfaces anyways, but previously COSMOS did default to handling packets being potentially identified using different fields in the same target. If you have a target that still requires that functionality, you need to declare CMD_UNIQUE_ID_MODE, and/or TLM_UNIQUE_ID_MODE in the target’s target.txt file to indicate it should use the slower identification method.
See the COSMOS documentation for directions on setting up DART: http://cosmosc2.com/docs/v4/
Ryan recently attended the Advanced Maui Optical and Space Surveillance Technologies Conference (AMOS) in September. He was selected for a poster presentation based on the paper entitled “An open source long term archiving and trending solution for SSA”. It was based on the COSMOS DART tool which supports long term storage and trending of command and telemetry data. If you look at the official AMOS Summary you might also spot him (hint: Thursday)!

Ryan at the Poster Session, AMOS 2019
Jason atteneded the conference back in 2017 and was able to present a talk about COSMOS based on another paper entitled “A Cloud-based, Open-Source, Command-and-Control Software Paradigm for Space Situational Awareness (SSA)”.
If you have a question, find a bug, or want a feature please use our Github Issues.
Here’s COSMOS 4.4.0! 52 tickets have been incorporated including 18 new features, 19 bug fixes and 15 general maintenance changes.
Overall this is just a stability bug fix release, but there are a few interesting changes. For one, max packet reception speed has been greatly increased due to ticket #911. CmdExtractor can now output in a CSV format. ScriptRunner has a recently opened file menu section, and the show_backtrace feature is now a menu option as well. There is much better support for giving absolute paths to config files on the command line. There is also a new LED type widget to display boolean telemetry.
Enjoy and see below for the full list of changes.
The faster identification in ticket #911 does come with a potentially breaking change. The improvement requires that all packets for a given target be identified using the same fields (bit offset, bit_size, and type). This is the typical configuration, and breaking this pattern is typically a dangerous/bad choice for interfaces anyways, but previously COSMOS did default to handling packets being potentially identified using different fields in the same target. If you have a target that still requires that functionality, you need to declare CMD_UNIQUE_ID_MODE, and/or TLM_UNIQUE_ID_MODE in the target’s target.txt file to indicate it should use the slower identification method.
To upgrade to the latest version of COSMOS, run “bundle update cosmos” in your COSMOS project folder.
See the COSMOS documentation for directions on setting up DART: http://cosmosc2.com/docs/v4/
Protocols were introduced into COSMOS in version 4.0.0. Protocols consist of the code that make sense of the incoming byte stream before it is turned into packets. They work hand in hand with the COSMOS interface that connects to the target, whether it is TCP/IP, UDP, or serial. The new COSMOS protocol system makes it possible to add and layer protocols into a COSMOS interface.
COSMOS comes with a number of built-in protocols that are used directly with the COSMOS provided interfaces. In fact, when you declare your interface you’re required to specify a protocol. For example, the following code declares a TCP/IP client with a LENGTH protocol.
INTERFACE INTERFACE_NAME tcpip_client_interface.rb localhost 8080 8081 10.0 nil LENGTH 0 16 0 1 BIG_ENDIAN 4 0xBA5EBA11
The built-in protocols are fully described on the Protocols page and also mentioned on the Interfaces page.
The built-in protocols are enough to support almost all of the data streams that you’ll encounter from a target. However, sometimes you need to massage the data a little by stripping off data or adding headers. This is when you should create a custom protocol. Custom protocols have 4 methods they can override to modify the incoming telemetry data or outgoing command data. They are read_data(data), write_data(data) and read_packet(packet) write_packet(packet). The ‘data’ methods operate on the raw binary data and are used when adding or removing raw bytes from the stream. The ‘packet’ methods operate on the data after it has been identified and converted to a COSMOS Packet.
A recent program was interfacing to a particular device that was sending the ASCII ETX character (0x03) at the end of the data. This character wasn’t needed and was confusing a legacy application that was parsing the raw data. A custom protocol was created to simply strip off this byte from the data stream.
In the target’s lib directory the strip_etx_protocol.rb file was created. Since the protocol had to simply strip off a single byte, it overrides the read_data(data) method.
require 'cosmos/interfaces/protocols/protocol'
class StripEtxProtocol < Protocol
  def read_data(data)
    if data[-1] == "\x03"
      return super(data[0..-2])
    else
      return super(data)
    end
  end
end
Ruby can index from the back of the array with -1, -2, etc. Thus if the last byte (-1) is a binary 0x03, the protocol returns the data from 0 up to and including the second to last byte (-2). This was added to the interface by declaring it as a READ protocol since it is only modifying the incoming telemetry data.
INTERFACE DEV_INT <interface params>
  PROTOCOL READ StripEtxProtocol
If you need to add framing data or other bits of protocol to your outgoing data you can create a custom protocol.
In the target’s lib directory create a file called framing_protocol.rb. Since the protocol is adding data to the outgoing stream, we override the write_data(data) method.
require 'cosmos/interfaces/protocols/protocol'
class FramingProtocol < Protocol
  HEADER = "\xDE\xAD\xBE\xEF" # Binary header data
  def write_data(data)
    super(HEADER + data)
  end
end
If you have a question, find a bug, or want a feature please use our Github Issues.
APPEND does not work with little endian bitfields.
Defining little endian bitfields is a little weird but does work in COSMOS.
Rules on how COSMOS handles LITTLE_ENDIAN data:
COSMOS bit offsets are always defined in BIG_ENDIAN terms. Bit 0 is always the most significant bit of the first byte in a packet, and increasing from there.
All 8, 16, 32, and 64-bit byte-aligned LITTLE_ENDIAN data types define their bit_offset as the most significant bit of the first byte in the packet that contains part of the item. (This is exactly the same as BIG_ENDIAN). Note that for all except 8-bit LITTLE_ENDIAN items, this is the LEAST significant byte of the item.
LITTLE_ENDIAN bit fields are defined as any LITTLE_ENDIAN INT or UINT item that is not 8, 16, 32, or 64-bit and byte aligned.
LITTLE_ENDIAN bit fields must define their bit_offset as the location of the most significant bit of the bitfield in BIG_ENDIAN space as described in rule 1 above. So for example. The following C struct at the beginning of a packet would be defined like so:
struct {
  unsigned short a:4;
  unsigned short b:8;
  unsigned short c:4;
}

ITEM A 4 4 UINT "struct item a"
ITEM B 12 8 UINT "struct item b"
ITEM C 8 4 UINT "struct item c"
This is hard to visualize, but the structure above gets spread out in a byte array like the following after byte swapping: least significant 4 bits of b, 4-bits a, 4-bits c, most significant 4 bits of b
The COSMOS system configuration is performed by system.txt in the config/system directory. This file declares all the targets that will be used by COSMOS as well as top level configuration information which is primarily used by the Command and Telemetry Server.
By default, all COSMOS tools use the config/system/system.txt file. However, all tools can take a custom system configuration file by passing the “–system
TOOL "Command and Telemetry Server" "LAUNCH CmdTlmServer --system system2.txt" "cts.png" --config cmd_tlm_server2.txt
So when would you want to create and use multiple system.txt files? Since system.txt defines the targets used by the system, you can use two different system.txt files to create two configurations which contain most but not all the same targets. For example, you have a test bench with 5 different test equipment targets but different test box targets: BOX1 and BOX2. You can create one COSMOS configuration for both test benches and create two different launcher files with different lists of targets.
The parsing of a COSMOS target is controlled by the target.txt file found at the root of the target directory. The COMMANDS and TELEMETRY keywords tell COSMOS which Command and Telemetry files to parse. For example from the COSMOS demo INST target.txt
COMMANDS inst_cmds.txt
TELEMETRY inst_tlm.txt
Since we can tell COSMOS exactly which command and telemetry files to parse we can control how the target cmd/tlm definitions get built. This is useful if you have a target with slightly different command and telemetry definitions. This can happen for varous reasons like connecting to slightly different hardware revisions. The advantage of using a single target folder in this case (vs just copying and renaming the target folder) is that you can (potentially) reuse screens and target library code. Obviously this only works if the command and telemetry definitions are only slightly different between revisions.
When we combine the ability in system.txt to specify a specific target.txt file and the ability in target.txt to specify the command and telemetry definitions, we can create specific configurations for different environments.
This example is losely based on the COSMOS demo. First create two separate system.txt files called system1.txt and system2.txt:
Partial system1.txt:
DECLARE_TARGET INST nil target1.txt
Partial system2.txt
DECLARE_TARGET INST nil target2.txt
The target1.txt file in the INST target calls out one set of cmd/tlm files:
COMMANDS inst1_cmds.txt
TELEMETRY inst1_tlm.txt
The target2.txt file in the INST target calls out another set:
COMMANDS inst2_cmds.txt
TELEMETRY inst2_tlm.txt
You also have to ensure your Launcher scripts specify the correct system.txt file when launching the tools:
Partial launcher1.txt:
TOOL "Command and Telemetry Server" "LAUNCH CmdTlmServer --system system1.txt" "cts.png" --config cmd_tlm_server.txt
Partial launcher2.txt:
TOOL "Command and Telemetry Server" "LAUNCH CmdTlmServer --system system2.txt" "cts.png" --config cmd_tlm_server.txt
Once you have your launcher configurations in place you can create a simple Batch file or shell script to launch COSMOS.
Launcher1.bat:
call tools\Launcher.bat --config launcher1.txt
Launcher2.bat:
call tools\Launcher.bat --config launcher2.txt
With correct usage of system.txt and target.txt you can consolidate your COSMOS configurations and avoid copying and pasting. This makes your COSMOS configuration easier to test and maintain.
Another way to modify a target is to override the target command and telemetry definitions. This is a useful practice if your target’s command and telemetry files are generated from a database or from some other system and you want to add COSMOS specific features. It is also handy to add custom conversions and formatting for displays.
Create a file in the target’s cmd_tlm folder named after the original file but with an extension like _override.txt. For example, you have the following telemetry definition file named inst_tlm.txt:
TELEMETRY INST HEALTH_STATUS BIG_ENDIAN "Health and status from the target"
  APPEND_ITEM COLLECTS         16 UINT     "Number of collects"
  APPEND_ITEM TEMP1            16 UINT     "Temperature #1"
Create another file called inst_tlm_override.txt and start overriding telemetry using the SELECT_TELEMETRY and SELECT_ITEM keywords. Note that the filename is important because by default COSMOS processes cmd/tlm definition files in alphabetical order. For example, if you have a telemetry file named “telemetry.txt” and created a file called “override.txt”, you would get an error because the telemetry file will not be processed before the override.
SELECT_TELEMETRY INST HEALTH_STATUS
  SELECT_ITEM COLLECTS
    FORMAT_STRING "0x%0X"
Note that you can include these override files as needed based on the target.txt file as described above.
If you have a question, find a bug, or want a feature please use our Github Issues.
Ball Aerospace COSMOS has been featured in a presentation by Chris Heistand from John Hopkins Applied Physics Laboratory. He’s working on the Double Asteroid Redirection Test (DART) not to be confused with COSMOS DART. They have setup COSMOS to run in a Docker container which X fowards to a X11Server VNC container which they then use a VNC Client to connect to. Pretty cool stuff which we we will hopefully have more out of the box support for in the future. Stay tuned!
Welcome to COSMOS 4.3.0!
The highlight of this release is built in support for differentiating between stored telemetry and realtime telemetry. If your system downlinks stored telemetry that you don’t want to interfere with the COSMOS realtime current value table, your interface/protocol code can set the stored flag on a packet before returning it to COSMOS to have COSMOS log the packet, but not update the current telemetry values.
Lots of other new features as well, and a few bug fixes including fixing running on the latest version of Mac OSX. See below for the full list.
Breaking Changes: The COSMOS log file format and predentified protocol formats have changed to support stored telemetry. COSMOS 4.3 is backwards compatible with earlier formats, but older versions of COSMOS won’t be able to read files from COSMOS 4.3+.
To upgrade to the latest version of COSMOS, run “bundle update cosmos” in your COSMOS project folder.
See the COSMOS documentation for directions on setting up DART: http://cosmosc2.com/docs/v4/
This is the second patch release for 4.2. It greatly improves the ingest speed for DART (100x), improves decom speed, reduces database size, and fixes some bugs. If you are using DART, please upgrade and follow the migration directions at the end of these release notes.
The highlight of COSMOS 4.2 is a new tool called the Data Archival and Retrieval Tool (DART). DART is a long term trending database built on top of the PostgreSql database. It integrates directly with TlmGrapher, TlmExtractor, CmdExtractor, DataViewer, and Replay, allowing you to do historical queries of logged telemetry (and commands) by specifying a time range. Queries are super fast and it performs automatic data reduction at minute/hour/day granularity. Consider setting it up for your project and start data mining today!
See the COSMOS documentation for directions on setting up DART: http://cosmosc2.com/docs/v4/
To upgrade to the latest version of COSMOS, run “bundle update cosmos” in your COSMOS project folder.
If you already setup DART for your program please follow the following additional steps: In a terminal in your COSMOS project folder run:
rake db:migrate
rake db:seed
See the COSMOS documentation for directions on setting up DART: http://cosmosc2.com/docs/v4/
COSMOS 4.2 is here! This is the first true patch release for 4.2. The highlight of COSMOS 4.2 is a new tool called the Data Archival and Retrieval Tool (DART). DART is a long term trending database built on top of the PostgreSql database. It integrates directly with TlmGrapher, TlmExtractor, CmdExtractor, DataViewer, and Replay, allowing you to do historical queries of logged telemetry (and commands) by specifying a time range. Queries are super fast and it performs automatic data reduction at minute/hour/day granularity. Consider setting it up for your project and start data mining today!
See the COSMOS documentation for directions on setting up DART: http://cosmosc2.com/docs/v4/
To upgrade to the latest version of COSMOS, run “bundle update cosmos” in your COSMOS project folder.
See the COSMOS documentation for directions on setting up DART: http://cosmosc2.com/docs/v4/
COSMOS 4.2 is here! Thirty four tickets went into this release, but the highlight is a new tool called the Data Archival and Retrieval Tool (DART). DART is a long term trending database built on top of the PostgreSql database. It integrates directly with TlmGrapher, TlmExtractor, CmdExtractor, DataViewer, and Replay, allowing you to do historical queries of logged telemetry (and commands) by specifying a time range. Queries are super fast and it performs automatic data reduction at minute/hour/day granularity. Consider setting it up for your project and start data mining today!
See the COSMOS documentation for directions on setting up DART: http://cosmosc2.com/docs/v4/
To upgrade to the latest version of COSMOS, run “bundle update cosmos” in your COSMOS project folder.
See the COSMOS documentation for directions on setting up DART: http://cosmosc2.com/docs/v4/
COSMOS has a concept of a derived item which is a telemetry item that doesn’t actually exist in the binary data. Derived items are typically computed based on other telemetry items. COSMOS automatically defines three derived items on every packet: RECEIVED_TIMESECONDS, RECEIVED_TIMEFORMATTED, and RECEIVED_COUNT. The time items are set to the time that the COSMOS Command and Telemetry Server receives the packet. The count is a running count of the number of packets received since the Server started. Note that the count is always a relative count and should only be used accordingly.
COSMOS derived items are defined very similarly to real items except they use the special DERIVED telemetry type. Here is how the default COSMOS derived items might look in a telemetry definition.
ITEM PACKET_TIMESECONDS 0 0 DERIVED "COSMOS Received Time (UTC, Floating point, Unix epoch)"
  READ_CONVERSION packet_time_seconds_conversion.rb
  FORMAT_STRING '%0.6f'
ITEM PACKET_TIMEFORMATTED 0 0 DERIVED "COSMOS Received Time (Local time zone, Formatted string)"
  READ_CONVERSION packet_time_formatted_conversion.rb
ITEM RECEIVED_TIMESECONDS 0 0 DERIVED "COSMOS Received Time (UTC, Floating point, Unix epoch)"
  READ_CONVERSION received_time_seconds_conversion.rb
  FORMAT_STRING '%0.6f'
ITEM RECEIVED_TIMEFORMATTED 0 0 DERIVED "COSMOS Received Time (Local time zone, Formatted string)"
  READ_CONVERSION received_time_formatted_conversion.rb
ITEM RECEIVED_COUNT 0 0 DERIVED "COSMOS packet received count"
  READ_CONVERSION received_count_conversion.rb
Note the DERIVED type where real items are INT, UINT, FLOAT, STRING or BLOCK. Also note that the bit offset and bit size values are zero. This is due to the fact that these items don’t actually exist in the binary packet but are created on the fly when the packet is processed. This also has implications with playback of the data. Since these items don’t actually exist in the binary file, they are created on the fly even when doing playback through the Replay tool. Thus if your DERIVED item is aggregating multiple values such as a running average, it will take a few samples to generate a good value.
A common usecase is to create a derived item which averages other telemetry points. Let’s explore how to do this within the COSMOS Demo. The COSMOS Demo already declares 4 fake temperatures named TEMP1, TEMP2, TEMP3, and TEMP4. Let’s create a new derived item called TEMP_AVERAGE that averages them.
ITEM TEMP_AVERAGE 0 0 DERIVED "Average of TEMP1, TEMP2, TEMP3, TEMP4"
  GENERIC_READ_CONVERSION_START FLOAT 32
    (packet.read("TEMP1") + packet.read("TEMP2") + packet.read("TEMP3") + packet.read("TEMP4")) / 4.0
  GENERIC_READ_CONVERSION_END
The GENERIC_READ_CONVERSION_START keyword also takes two additional argument which describe the output of the conversion. Here we specify FLOAT 32 to indicate the conversion will return a 32 bit floating point value.
In the code section, note the use of the built in variable called ‘packet’. When you create a generic conversion you always have access to the ‘packet’ variable which references the packet the conversion is declared in. For more information about how to use ‘packet’ please see the Packet documentation. You also have access to ‘value’ which is the raw value of the current item. In the case of a DERIVED item the value is nil. You can also access ‘buffer’ which is the raw buffer associated with the packet.
While it is easy to create a simple conversion using GENERIC_READ_CONVERSION there are multiple reasons to prefer a Conversion class. Creating a separate conversion class is easier to test, easier to reuse and has better performance. Let’s create a conversion which performs averging and rewrite the previous example. First the telemetry definition will now look like this.
ITEM TEMP_AVERAGE 0 0 DERIVED "Average of TEMP1, TEMP2, TEMP3, TEMP4"
  READ_CONVERSION average_conversion.rb TEMP1 TEMP2 TEMP3 TEMP4
We now need to implement average_conversion.rb to take our arguments and generate the average. Put this new file in the target’s lib folder (in the demo this is config/targets/INST/lib).
require 'cosmos/conversions/conversion'
module Cosmos
  class AverageConversion < Conversion
    def initialize(*args)
      super()
      @items = args
      @converted_type = :FLOAT
      @converted_bit_size = 32
    end

    def call(value, packet, buffer)
      total = 0
      @items.each do |item|
        total += packet.read(item)
      end
      return total / @items.length
    end
  end
end
Here I’m using the Ruby splat operator to collect all the arguments passed into initialize and assign them to @items. I also explicitly set the @converted_type and @converted_bit_size variables (part of the Conversion base class) to :FLOAT and 32 to indicate our conversion will return a 32 bit floating point number. The call method is what actually performs the conversion. Note how it defines the same three variables I previously talked about: value, packet and buffer. I use the packet argument to read the items passed in and then divide by the total to average them.
We’re not yet done though as we need to edit the INST/target.txt file to require this new conversion.
REQUIRE average_conversion.rb
Running this in the Demo with Telemetry Grapher shows our new average value pretty clearly.
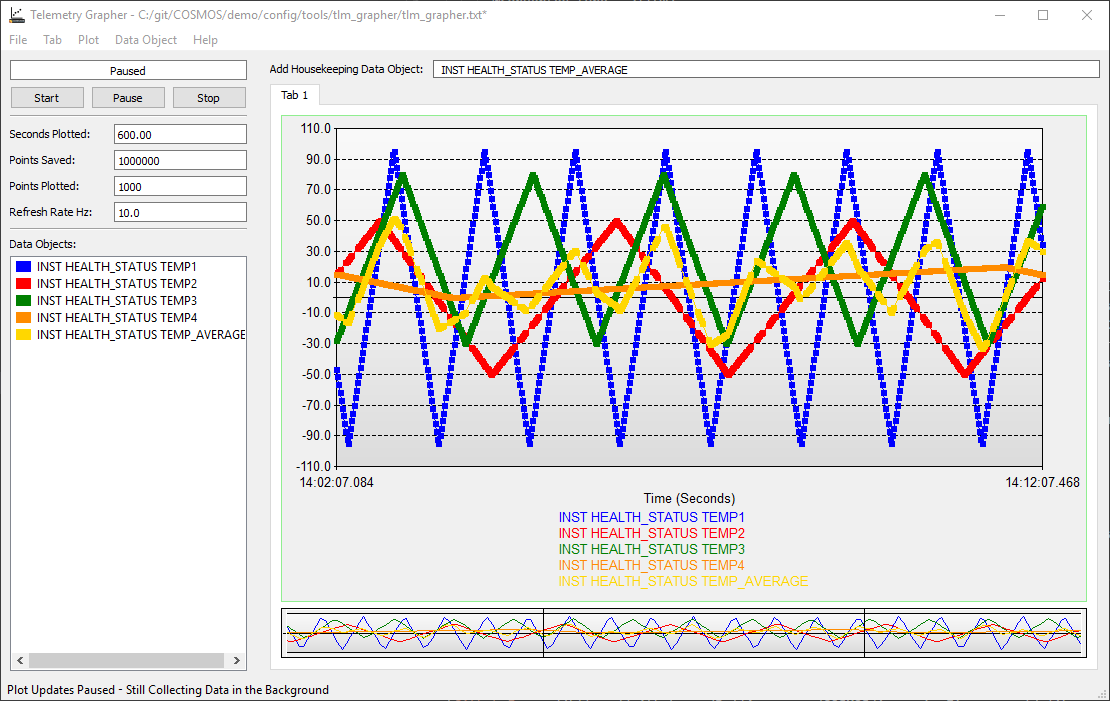
Conversions and DERIVED variables are powerful ways to add additional telemetry points based on existing data in your packet structure. Another way to add insight into your telemetry is to add Packet Processors which I’ve previously blogged about.
If you have a question which would benefit the community or find a possible bug please use our Github Issues.
COSMOS allows you to define limits for your telemetry items to provide feedback to users about how your telemetry is performing. If you define limits, COSMOS requires you to specify both red and yellow limits. Red limits are traditionally where damage may occur while yellow limits are set a certain percentage away from red to give the operator a chance to respond before the red limits are hit. COSMOS also allows the user to set “Operational” limits (blue limits) which specify a desired operational range inside the green limits. This is best illustrated in the COSMOS demo. Here is a partial screenshot of the INST HS screen in Telemetry Viewer.

The TEMP1 telemetry point is using the LABELTRENDLIMITSBAR widget in the INST HS screen definition to display both the value (the temperature), the trend (how the data has been moving over the past 60s), as well as the limits bar. The TEMP2 telemetry point is simply using the LABELVALUELIMITSBAR widget so it shows just the value and the limits bar. Notice how the scale of the yellow regions are different for TEMP1 and TEMP2. The regions are scaled according to their defined value ranges.
This type of limits bar is also used by the Limits Monitor tool to display out of limits items system wide.
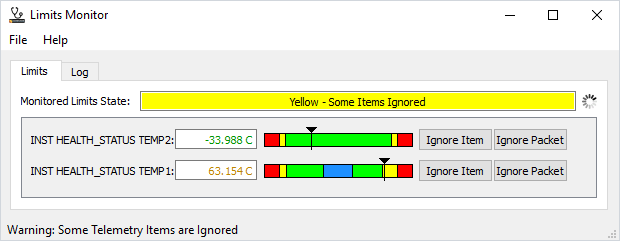
Here I’ve ignored various other items to focus on the INST HEALTHSTATUS packet containing TEMP1 and TEMP2. Notice that the overall limit is yellow since TEMP1 is yellow even though TEMP2 is green. The worst case limts item is reflected in the Monitored Limits State. Also note that TEMP2 appears above TEMP1 because it happened to go out of limits first while I was running the demo. Items appear in Limits Monitor as they go out of limits. Also note that even though TEMP2 is green it still shows up in Limits Monitor because it _previously went out of limits. If you switch to the Log tab you can see exactly when an item went out of limits and when it went back to green.
You can get this same information from a script by executing the following script in Script Runner.
puts "Overall limits state: #{get_overall_limits_state}"
get_out_of_limits.each do |item|
  tgt, pkt, item, state = item
  puts "tgt:#{tgt} pkt:#{pkt} item:#{item} state:#{state}"
end
Note that the get_out_of_limits call returns the items which are out of limits at the exact instant of the API call. Thus it doesn’t provide history like the Limits Monitor tool.
You can also disable and enable limits on individual telemetry items using the API. The following script will disable limits on TEMP1 and then after 5 seconds it re-enables limits. Run this with the Limits Monitor open and you’ll notice the text for the INST HEALTH_STATUS TEMP1 telemetry point turns black when limits are disabled. Note that this disables limits events logging in the Command and Telemetry Server for this telemetry point.
puts "TEMP1 limits enable:#{limits_enabled?("INST", "HEALTH_STATUS", "TEMP1")}"
disable_limits("INST", "HEALTH_STATUS", "TEMP1")
puts "TEMP1 limits enable:#{limits_enabled?("INST", "HEALTH_STATUS", "TEMP1")}"
wait 5
enable_limits("INST", "HEALTH_STATUS", "TEMP1")
puts "TEMP1 limits enable:#{limits_enabled?("INST", "HEALTH_STATUS", "TEMP1")}"
COSMOS requires the first item after the LIMITS keyword to be the name of the limits set. Limits sets are system wide sets of limits which can be applied depending on the environment you’re testing in. Perhaps you have a “Test” set of limits which are different from your “Operational” limits. At Ball Aerospace, we frequently define cyrogentic limits when testing spacecraft in a vacuum chamber at cyrogenic temperatures. COSMOS requires at least one limits definition to belong to “DEFAULT” which is used when COSMOS starts. If you forget to define a DEFAULT limits set, you’ll get this error when you start the COSMOS Command and Telemetry Server.
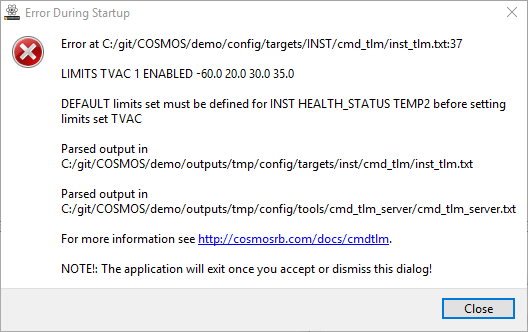
Once you’ve defined your limits sets how do you use them? The COSMOS Command and Telemetry Server has a Status tab which allows you to manually change the limits set using a drop down.
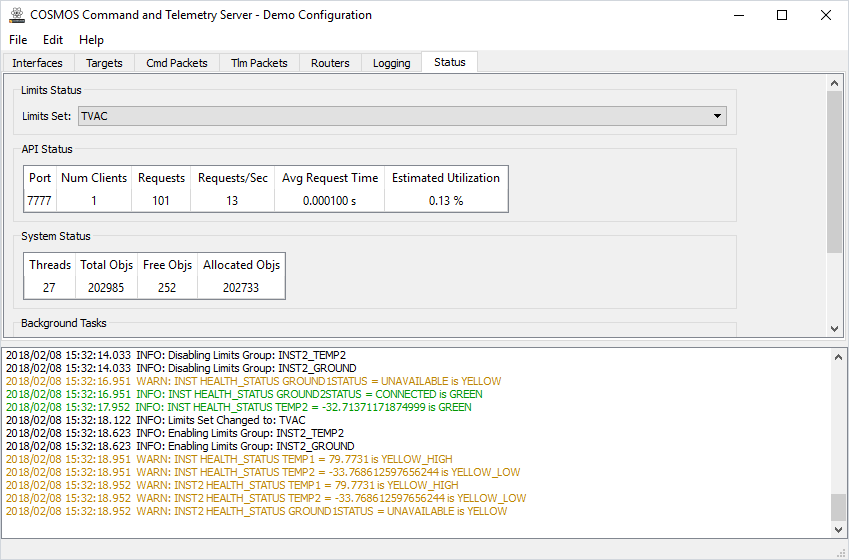
Notice the log contains “INFO: Limits Set Changed to: TVAC”. This happened immediately after I manually changed the Limits Set drop down from DEFAULT to TVAC. This message is automatically generated whenever the limits set is changed either manually or from the API.
You can also manipulate the limits sets programatically from a script.
get_limits_sets.each { |set| puts "Limits Set:#{set}" }
puts "Current Set:#{get_limits_set()}" # Currently selected limits set
set_limits_set("DEFAULT") # Change to DEFAULT
set_limits_set("TVAC") # Change to TVAC
COSMOS also has the concept of limits groups. Limits groups are used to group together telemetry items so they can be enabled and disabled together. For example, if you have several physical devices in your system, you can group together items from each device and enable their limits when they power on and disable them when they power off. This is useful to avoid limits violations on items which are currently off and returning zeros.
Limits groups are defined by the LIMITS_GROUP keyword. Typically this is a separate file in your target’s cmd_tlm folder. If you’re creating a group which combines items from multiple targets we recommend to define this in the SYSTEM target’s cmd_tlm folder. This is how the COSMOS demo is configured with a limits_groups.txt file in SYSTEM/cmd_tlm.
Items are assigned to a group using the LIMITS_GROUP_ITEM keyword. Here is the definition in the COSMOS demo.
LIMITS_GROUP INST2_TEMP2
  LIMITS_GROUP_ITEM INST2 HEALTH_STATUS TEMP2

LIMITS_GROUP INST2_GROUND
  LIMITS_GROUP_ITEM INST2 HEALTH_STATUS GROUND1STATUS
  LIMITS_GROUP_ITEM INST2 HEALTH_STATUS GROUND2STATUS
You can also manipulate the limits groups programatically from a script.
get_limits_groups.each { |group| puts "Limits Group:#{group}" }
enable_limits_group("INST2_TEMP2")
disable_limits_group("INST2_GROUND")
COSMOS also has the ability to automatically enable and disable limits groups based on user configurable conditions. For example, you can automatically enable the group for a particular device when the power supply voltage for that device goes high (the device is powered on). The COSMOS demo has an example of this in the SYSTEM/lib/limits_groups.rb file.
require 'cosmos/tools/cmd_tlm_server/limits_groups_background_task'

module Cosmos
  # Inheriting from the LimitsGroupsBackgroundTask provides a framework for
  # automatically enabling and disabling limits groups based on telemetry.
  class LimitsGroups < LimitsGroupsBackgroundTask
    # Initial delay upon starting the server before staring the group checks
    # followed by the background task delay between check iterations
    def initialize(initial_delay = 0, task_delay = 0.5)
      super(initial_delay, task_delay)
      # Creating a Proc allows for arbitrary code to be executed when a group is enabled or disabled
      @temp2_enable_code = Proc.new do
        enable_limits_group('INST2_GROUND') # Enable the INST2_GROUND group
      end
      @temp2_disable_code = Proc.new do
        disable_limits_group('INST2_GROUND') # Disable the INST2_GROUND group
      end
    end
  end
end
You first must require the COSMOS base class and inherit from LimitsGroupsBackgroundTask. The constructor (initialize) takes two delay parameters. The first is the initial delay after starting the Command and Telemetry Server before the task starts checking your logical conditions. The second is the delay between doing the checks (it controls the rate of the task). After calling super (important!) a Proc is created to run arbitrary code when a particular group is enabled or disabled. Note this is entirely optional but in this case we wanted to enable the INST2_GROUND group when the INST2_TEMP2 group got enabled. The @temp2_enable_code and @temp2_disable_code names don’t really matter but they must be unique and have the ‘@’ symbol to make them Ruby instance variables (rather than locals).
After the constructor is configured the method to perform the check is implemented.
def check_inst2_temp2
  process_group(0, @temp2_enable_code, @temp2_disable_code) do
    val = tlm("INST2 HEALTH_STATUS TEMP2")
    return (!val.nan? && !val.infinite?)
  end
end
The method name is very important. It must begin with ‘check_’ and end with the name of a Limits Group defined by the LIMITS_GROUP keyword. In the demo, LIMITS_GROUP(s) are defined in config/targets/SYSTEM/cmd_tlm/limits_groups.txt. Since there is a LIMITS_GROUP INST2_TEMP2 we have a match (the method name should be lower case while the LIMITS_GROUP is typically defined to be uppercase).
Inside the method you must call process_group. The first parameter is the number of seconds to delay before enabling the group when the telemetry check is true. So in this example we are waiting zero seconds to enable the group. Note that when the telemetry check is false the group is instantly disabled. The next two parameters are Proc objects which are called when the group is enabled and disabled respectively. Remember that we defined our Proc objects in the constructor to enable and disable the INST2_GROUND group. These parameters are entirely optional so you can also simply call process_group(0) with just the delay.
The code inside the process_group block (the lines after ‘do’ and before ‘end’) must return a boolean. True will enable the group and false will disable the group. In this example, the group is enabled when the value is not NaN (Not a Number) and not Infinite. If the value is NaN or Infinite the group is disabled. You can watch this happening in the demo by watching the bottom log portion of the Command and Telemetry Server.
2018/02/12 09:12:58.118  ERROR: INST HEALTH_STATUS TEMP2 = NaN is RED_LOW
2018/02/12 09:12:58.121  ERROR: INST2 HEALTH_STATUS TEMP2 = NaN is RED_LOW
2018/02/12 09:12:58.220  INFO: Disabling Limits Group: INST2_TEMP2
2018/02/12 09:12:58.220  INFO: Disabling Limits Group: INST2_GROUND
First TEMP2 transitions to NaN (this is done on purpose for the demo) which is a RED_LOW limits violation. 100ms later (due to processing time) the INST2_TEMP2 group is disabled followed by the INST2_GROUND group due to the Proc code we created.
There are a few other APIs which are provided to work with COSMOS limits.
get_stale returns all the stale packets in the system. Stale packets are those which have not been received by the Command and Telemetry Server for the STALENESS_SECONDS setting (by default 30s).
get_limits(tgt, pkt, item) returns the limits settings for a particular telemetry item. It returns an array of the group name, persistence setting, enable setting, red low, yellow low, yellow high, red high, blue low, and blue high limits values. If no blue operational limits were set those values are nil.
set_limits(tgt, pkt, item, red_low, yellow_low, yellow_high, red_high,
blue_low = nil, blue_high = nil, limits_set = :CUSTOM, persistence = nil, enabled = true) allows the user to set new values for the limits settings. Some values have defaults and some do not. Thus you must provide at least the first 7 parameters for this call to be successful. Note the order of parameters: red low, yellow low, yellow high, red high, and then blue low, blue high. By default the limits_set is :CUSTOM which is probably not a limits set you already have defined. Thus is you don’t set the limits_set parameter it may appear as if nothing has happened. To enable the new limits you have to manually change to the CUSTOM limits set: set_limits_set("CUSTOM"). Alternatively, you can specify :DEFAULT for the limits_set parameter and you will typically immediately see the change (assuming DEFAULT is the active set). If you only want to change one particular value you can call get_limits first to get the current settings and only change the value you want.
You can also use API methods to subscribe to limits events. This allows you to process all limits events in the same way the Limits Monitor application does. To start you must subscribe to limits events using subscribe_limits_events(queue_size = 1000) which returns an ID. You can then call get_limits_event(id) and pass in the ID to get limits event type and data from the server. There are three different limits event types: LIMITS_CHANGE, LIMITS_SET, and LIMITS_SETTING. LIMITS_CHANGE is when a particular item goes out of limits. This is by far the most common and probably the one you’re most interested in. LIMITS_SET events happen when the overall limits set changes. LIMITS_SETTING events are generated when the set_limits method is called to change the limits on an individual item. The get_limits_event method takes a boolean second parameter to determine whether or not to block when waiting for an event. The default is false which means it blocks waiting for an event. You can also pass true which means to not block waiting for events. However if no event is present get_limits_event will raise a ThreadError. Thus you must catch the error to allow your code to continue. Finally you call unsubscribe_limits_events(id) when shutting down.
Overflown Queues Are Deleted
By default the limits queue is 1000 events deep. If you don't call get_limits_event fast enough to keep up with the population of this queue and it overflows, COSMOS will clean up the resources and delete the queue. At this point when you call get_limits_event you will get a "RuntimeError : Packet data queue with id X not found." Note you can pass a larger queue size to the subscribe_limits_events method.
Here’s a example of using the subscription APIs.
id = subscribe_limits_events()
while true
  type, data = get_limits_event(id) # block waiting
  puts "type:#{type} data:#{data}"
  # break if XXX # Break the loop when ...
end
unsubscribe_limits_events(id)

id = subscribe_limits_events()
while true
  begin
    type, data = get_limits_event(id, true) # don't block
    puts "type:#{type} data:#{data}" # break if XXX # Break the loop when ...
  rescue ThreadError # raised if no event present
    wait 1 # Wait before checking again
  end
end
unsubscribe_limits_events(id)
Limits are a powerful concept in COSMOS. Sets provide for a system wide setting that affects all limits items. Groups allow limits items to be grouped to typically enable and disable them together. APIs allow the user to query and set limits across the system while subscriptions provide notifications for every limits event action.
If you have a question which would benefit the community or find a possible bug please use our Github Issues.
Metadata is data about data, i.e. information describing the data like when it was taken, version information, etc. COSMOS has explicit support for metadata, especially since the 4.0.0 release.
In versions of COSMOS prior to 4.0.0, metadata could be defined in any target / packet combination. In the COSMOS demo we defined metadata in the META target and DATA packet. You would then explicitly tell COSMOS where this metadata was defined by passing the target and packet name to the tools. Here is a example of an old (pre 4.0.0) cmd_tlm_server.txt configuration file:
PACKET_LOG_WRITER DEFAULT meta_packet_log_writer.rb META DATA config/data/meta_init.txt
COLLECT_METADATA META DATA
Here is an example of a current (post 4.0.0) cmd_tlm_server.txt configuration file:
PACKET_LOG_WRITER DEFAULT packet_log_writer.rb nil true nil 2000000000 nil false
COLLECT_METADATA
The PACKET_LOG_WRITER and COLLECT_METADATA keywords no longer have to specify where the metadata is stored because COSMOS 4.0.0 standardized the metadata definition in the SYSTEM target and META packet. You’ll notice the old cmd_tlm_server.txt file specified the location of a meta_init.txt file. This file contains the default values to use when initializing the metadata dialog. In post COSMOS 4.0.0 this file is defined in system.txt using the META_INIT keyword like so:
META_INIT config/data/meta_init.txt
Note that you do not have to define all the items in your metadata in your meta_init file. Any items not found in meta_init will simply be blank in the dialog. If you try to set any of the COSMOS reserved items (defined below) they will simply be overriden with the COSMOS defined values.
If you do not define any metadata in your system (you don’t declare the SYSTEM META packet), COSMOS will automatically define the following items:
SYSTEM META PKTID - Always 1 and used to identify the packetSYSTEM META CONFIG - Configuration name (MD5 checksum)SYSTEM META COSMOS_VERSION - COSMOS Version (e.g. 4.1.1)SYSTEM META USER_VERSION - Defined by the USER_VERSION constant. Typically set in lib/user_version.rb in your configuration.SYSTEM META RUBY_VERSION - Ruby Version (e.g. 2.4.2p198)These items help identify the telemetry being collected by the currently running instance of the COSMOS Server. In fact, every time COSMOS starts a new log file it adds the SYSTEM META packet to the beginning. This behavior was possible prior to COSMOS 4.0.0 but required using the special meta_packet_log_writer in the cmd_tlm_server.txt definition as shown in the first cmd_tlm_server.txt example.
If you want to add your own fields to the COSMOS metadata you must define the standard COSMOS metadata items and then append your new values. For example, the COSMOS demo defines the following in targets/SYSTEM/cmd_tlm/meta_tlm.txt:
TELEMETRY SYSTEM META BIG_ENDIAN "System Meta Data Telemetry Packet"
APPEND_ID_ITEM PKTID 8 UINT 1 "Packet Id"
APPEND_ITEM CONFIG 256 STRING "Configuration Name"
APPEND_ITEM COSMOS_VERSION 240 STRING "COSMOS Version"
META READ_ONLY
APPEND_ITEM USER_VERSION 240 STRING "User Project Version"
META READ_ONLY
APPEND_ITEM RUBY_VERSION 240 STRING "Ruby Version"
META READ_ONLY
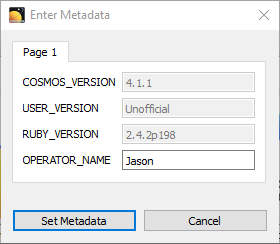
APPEND_ITEM OPERATOR_NAME 512 STRING "Operator Name"
Here we see the demo defining their own new metadata item called OPERATOR_NAME after the standard COSMOS items. Note that the definition of the standard COSMOS items is important! If you misspell an item, declare the wrong data type, or have the size wrong, COSMOS will warn you that the definition is incorrect and then define the standard set of items as described above. Thus if you’re trying to create additional items and do not see them, make sure you haven’t defined the COSMOS standard items incorrectly. (Note: COSMOS 4.1.2 fixed a bug in this automatic generation of metadata items)
You can also see the use of the META READ_ONLY keyword being used in the demo configuration. This means that the metadata dialog which is opened when the COLLECT_METADATA keyword is used will display these items as read only as shown below:
Also note that you can declare metadata items with STATES and they will be displayed as dropdowns in the metadata dialog. For example if you add the following to the SYSTEM META packet:
APPEND_ITEM UUT 32 UINT "Unit under test"
  STATE ARTICLE_0 0
  STATE ARTICLE_1 1
You would see this:

Test Runner also has the ability to require the user to acknowledge the metadata dialog. If you add COLLECT_METADATA to the Test Runner configuration file you will see the metadata dialog upon starting any test. This is useful to force the test operator to think about anything in the metadata that might have changed prior to running the test. In addition, this forces a new telemetry file to be created with this new metadata information (remember each new binary file contains a SYSTEM META packet at the beginning).
Metadata is a useful way to add information which can’t be determined by the available hardware targets. The OPERATOR_NAME in the demo is an obvious example. Start using metadata to your advantage to help you distinguish your telemetry.
If you have a question which would benefit the community or find a possible bug please use our Github Issues.
Any custom tools in other languages that use the COSMOS API will need to be updated.
To upgrade to the latest version of COSMOS, run “bundle update cosmos” in your COSMOS project folder.
COSMOS 4.1 has been released and several new noteworthy features were released which weren’t fully captured by the recent release description. This post will break down the highlights from the new features, maintence items, and bug fixes from the 4.1.0 release.
I think the best new feature in COSMOS 4.1.0 is the ability of the Reply tool to work side by side with the Command and Telemetry Server (#559). This change actually affects far more than just the Replay tool and the Server because a new “Replay Mode” was built into Data Viewer, Limits Monitor, Packet Viewer, Telemetry Grapher, and Telemetry Viewer.
Replay also got a cosmetic upgrade to look more like the Command and Telemetry Server. Here’s the new Replay in action:
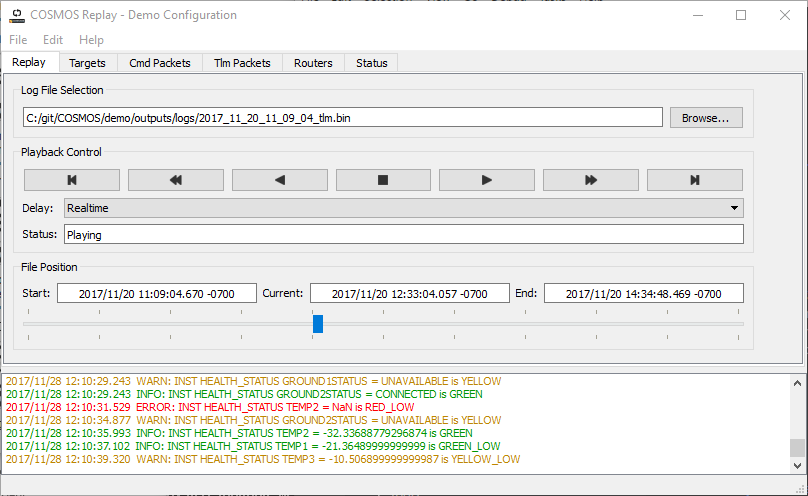
Replay now has tabs for Targets, Cmd Packets, Tlm Packets, Routers, and Status which correspond to the same tabs in the Server. These tabs count the number of packets being processed by Replay. Thus if you rewind the file and play it back, the counts simply keep incrementing.
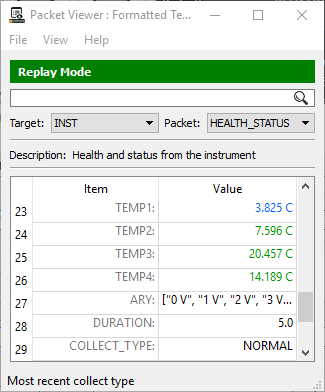
Here’s a screenshot of Packet Viewer displaying data in this new Replay mode:
Here’s another screenshot of Telemetry Grapher displaying data in this new Replay mode:

You’ll notice the tools have a new File menu option to toggle the Replay mode which displays a green “Replay Mode” bar to visually indicate the tool is no longer processing real-time data.
Issue #579 was implemented to zip up the COSMOS saved configuration files. This makes configuration managing these saved configurations much easier since you only have to check in a single zip file instead of a folder containing dozens of files and folders.
If you’re not familiar with saved configurations, let me explain why this is important. When COSMOS starts, it parses the configuration files, calculates the MD5 sum, and puts a copy of the configuration in outputs/saved_config (by default). You should always configuration manage these files in the saved_config directory to allow COSMOS to parse old binary files created by that configuration. The only exception is during COSMOS configuration development when you’re certain you no longer need to parse old telemetry bin files.
As an example of how these saved configurations work, consider that you collect data during a test. Next you modify the configuration by adding some telemetry items to a packet which increases the packet length. If you try to parse the old binary file, COSMOS would complain that the binary packet is not long enough to match the new definition. However, if you save the old configuration, COSMOS would match the MD5 sum in the packet with the saved configuration and load the configuration to parse the packet. Note that if COSMOS can’t find the saved configuration it uses the current configuration.
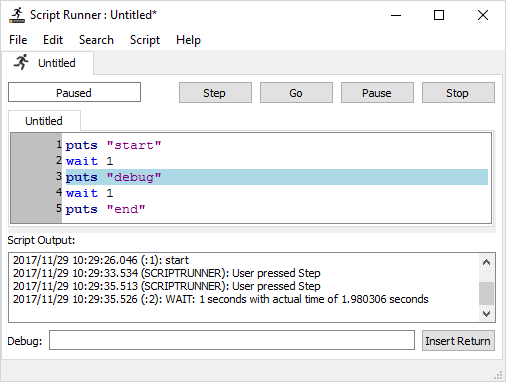
Issue #620 was to move the Script Runner Step button next to the Start, Pause, Stop buttons rather than down in the debugging pane. This should make it a lot easier to use the Step feature when debugging scripts. Here’s a screenshot of a simple script I started using the Step button (available when you enable Debugging via the Script / Toggle Debug menu).
Issue #619 was implemented to prevent Script Runner from instrumenting comments and whitespace when running scripts. This should also make debugging scripts easier as you don’t have to step over a bunch of comments or whitespace.
As Ryan mentioned in the 4.1 Release Notes, issue #510 was created to move the COSMOS API from our custom protocol to HTTP. While this change is transparent to the user, it should make it easier for other languages and tools to interface with the COSMOS system in the future.
There were a number of bug fixes as noted in the 4.1 Release Notes. #617 and #659 were both related to Ruby 2.4.2 which is the new Ruby version in COSMOS 4.0. Ruby 2.4 is the latest version of Ruby which provides performance improvements you can read about on ruby-lang.org. #616 addresses an annoying message generating by QT on Windows 10. #655 addresses an issue with using COLLECT_METADATA in the basic “install” version of COSMOS. #633 fix a bug where the prompt_vertical_message_box and prompt_combo_box scripting methods were mutating the input parameters. If you’re using those scripting methods, you should upgrade to COSMOS 4.1.
There were a number of other enhancements and bug fixes but the previous list is a compelling reason to upgrade to COSMOS 4.1 today!
Welcome to COSMOS 4.1! The COSMOS API has transitioned from a custom TCP protocol to HTTP. This will make interfacing to COSMOS from programming languages other than Ruby much easier. There are also many new APIs that allows the full functionality of the CmdTlmServer and Replay to be controlled remotely. See below for the full list of changes!
Any custom tools in other languages that use the COSMOS API will need to be updated.
To upgrade to the latest version of COSMOS, run “bundle update cosmos” in your COSMOS project folder.
As a COSMOS developer I often get asked about require vs load vs require_utility vs load_utility and what do they all mean. Let me explain these keywords and how they are used within Ruby and COSMOS.
The Ruby programming language defines the keywords ‘require’ and ‘load’. These are actually methods on the Kernel class and you can find the full documention on ruby-doc.org for both require and load. They basically include additional Ruby source files into the current execution environment so they can be used by your code. The key difference is that require will only include a file once. If you try to require a file a second time the require method actually returns false indicating that the file has already been required. You can easily test this by opening an IRB session and requiring something twice.
irb(main):001:0> require 'cosmos'
=> true
irb(main):002:0> require 'cosmos'
=> false
This has key implications for usage in COSMOS, especially when writing scripts for use in Script Runner or Test Runner. Let’s say you have a subroutine that you want to call (and don’t want to watch the line by line execution of). You require it in your script and execute it. You realize you have a bug in this required script and edit the file. Now you re-run the top level script but notice none of your changes have been include! What gives?! The require keyword notices that you’ve already required the file and thus does not re-load it on the next execution of your script. This has led some COSMOS users to simply close and re-open Script Runner or Test Runner each time they edit something. While this solves the require problem there is a better solution: load.
The load keyword loads the specified file everytime and thus reparses any changes that may have been made to the file in question. This is almost always what you want to use when writing scripts for COSMOS as it allows you to edit files and be assured that you will be running the latest. Note the difference when using load in this IRB session.
irb(main):001:0> load 'cosmos.rb'
=> true
irb(main):002:0> load 'cosmos.rb'
=> true
irb(main):003:0> load 'cosmos'
LoadError: cannot load such file -- cosmos
        from (irb):3:in 'load'
        from (irb):3
        from C:/Ruby233p222-x64/bin/irb.cmd:19:in '<main>'
irb(main):004:0> require 'cosmos.rb'
=> true
When using the keyword load you must add the .rb Ruby extension to the file you are trying to load. Leaving this off (which is allowed with the require keyword) will result in a LoadError as shown above. Note that require works with or without the .rb Ruby extension and that the previous load of cosmos.rb did not affect the require of cosmos.rb (it still had never been required).
Now that we’ve established how the require and load keywords work in Ruby, how does the load_utility keyword work in COSMOS? This keyword is COSMOS specific and means that COSMOS will step through the included source file when it is called. This is useful for debugging subroutines or for things that you simply want to watch execute. It is not recommended for subroutines that take an extended time to process like looping over large datasets. This will SIGNIFICANTLY slow down the execution of this code as it shows each line execute in the GUI.
Note that COSMOS also has a require_utility keyword. This keyword works exactly like load_utility which is why we recommend using load_utility going forward as it better matches the Ruby keywords in what it is doing. This keyword is effectively deprecated and may be removed in future versions of COSMOS.
After talking aobut require and load I think this is a good place to talk a little about the Ruby Load Path since it directly affects whether a require or load will succeed. The overall Ruby load path can be found by typing $LOAD_PATH. Doing this in my IRB session running Ruby 2.3.3 results in the following.
irb(main):004:0> puts $LOAD_PATH
C:\git\cosmos\lib
C:/Ruby233p222-x64/lib/ruby/gems/2.3.0/gems/did_you_mean-1.0.0/lib
C:/Ruby233p222-x64/lib/ruby/site_ruby/2.3.0
C:/Ruby233p222-x64/lib/ruby/site_ruby/2.3.0/x64-msvcrt
C:/Ruby233p222-x64/lib/ruby/site_ruby
C:/Ruby233p222-x64/lib/ruby/vendor_ruby/2.3.0
C:/Ruby233p222-x64/lib/ruby/vendor_ruby/2.3.0/x64-msvcrt
C:/Ruby233p222-x64/lib/ruby/vendor_ruby
C:/Ruby233p222-x64/lib/ruby/2.3.0
C:/Ruby233p222-x64/lib/ruby/2.3.0/x64-mingw32
=> nil
You’ll notice most of these paths are relative to my Ruby installation at C:/Ruby233p222. I also have an entry for my developer copy of COSMOS due to my environment variable of RUBYLIB=C:\git\cosmos\lib. As a COSMOS developer I have this variable set but you most likely will not. Setting the RUBYLIB environment variable is useful when developing but can interfere with loading gems since it is at the top of the $LOAD_PATH.
When you start requiring other libraries they typically add things to your LOAD_PATH. Watch what happens when I require ‘cosmos’.
irb(main):001:0> require 'cosmos'
=> true
irb(main):002:0> puts $LOAD_PATH
C:/Ruby233p222-x64/lib/ruby/gems/2.3.0/gems/uuidtools-2.1.5/lib
C:\git\cosmos\lib
C:/Ruby233p222-x64/lib/ruby/gems/2.3.0/gems/did_you_mean-1.0.0/lib
C:/Ruby233p222-x64/lib/ruby/gems/2.3.0/gems/bundler-1.15.4/lib
C:/Ruby233p222-x64/lib/ruby/gems/2.3.0/gems/json-1.8.6/lib
C:/Ruby233p222-x64/lib/ruby/gems/2.3.0/extensions/x64-mingw32/2.3.0/json-1.8.6
C:/Ruby233p222-x64/lib/ruby/gems/2.3.0/gems/rack-2.0.3/lib
C:/Ruby233p222-x64/lib/ruby/gems/2.3.0/gems/puma-3.10.0/lib
C:/Ruby233p222-x64/lib/ruby/gems/2.3.0/extensions/x64-mingw32/2.3.0/puma-3.10.0
C:/Ruby233p222-x64/lib/ruby/gems/2.3.0/gems/uuidtools-2.1.5/lib
C:/Ruby233p222-x64/lib/ruby/gems/2.3.0/gems/mini_portile2-2.3.0/lib
C:/Ruby233p222-x64/lib/ruby/gems/2.3.0/gems/nokogiri-1.8.1-x64-mingw32/lib
C:/Ruby233p222-x64/lib/ruby/gems/2.3.0/gems/rubyzip-1.1.7/lib
C:/Ruby233p222-x64/lib/ruby/site_ruby/2.3.0
C:/Ruby233p222-x64/lib/ruby/site_ruby/2.3.0/x64-msvcrt
C:/Ruby233p222-x64/lib/ruby/site_ruby
C:/Ruby233p222-x64/lib/ruby/vendor_ruby/2.3.0
C:/Ruby233p222-x64/lib/ruby/vendor_ruby/2.3.0/x64-msvcrt
C:/Ruby233p222-x64/lib/ruby/vendor_ruby
C:/Ruby233p222-x64/lib/ruby/2.3.0
C:/Ruby233p222-x64/lib/ruby/2.3.0/x64-mingw32
=> nil
Now a bunch of gems have added themselves to my $LOAD_PATH. These gems are the gems that cosmos has dependencies on. Note that when you require or load a file the $LOAD_PATH entries are searched in order. Thus in the above example a file in the uuidtools library will be found before a file in the rubyzip library.
You can display your $LOAD_PATH from Script Runner by simply running “puts $LOAD_PATH” from Script Runner. When I do this I get the following in my Script Output:
2017/11/13 10:58:21.815 (SCRIPTRUNNER): Starting script:
2017/11/13 10:58:22.076 (:1): C:/git/COSMOS/demo/procedures
2017/11/13 10:58:22.076 (:1): C:/Ruby233p222-x64/lib/ruby/gems/2.3.0/gems/uuidtools-2.1.5/lib
2017/11/13 10:58:22.076 (:1): C:/git/COSMOS/demo/lib
2017/11/13 10:58:22.076 (:1): C:/Ruby233p222-x64/lib/ruby/gems/2.3.0/gems/bundler-1.15.4/lib
2017/11/13 10:58:22.076 (:1): C:/Ruby233p222-x64/lib/ruby/gems/2.3.0/gems/ruby-prof-0.15.9/lib
2017/11/13 10:58:22.076 (:1): C:/Ruby233p222-x64/lib/ruby/gems/2.3.0/extensions/x64-mingw32/2.3.0/ruby-prof-0.15.9
2017/11/13 10:58:22.076 (:1): C:/Ruby233p222-x64/lib/ruby/gems/2.3.0/gems/roodi-4.1.1/lib
2017/11/13 10:58:22.076 (:1): C:/Ruby233p222-x64/lib/ruby/gems/2.3.0/gems/reek-1.6.6/lib
2017/11/13 10:58:22.076 (:1): C:/Ruby233p222-x64/lib/ruby/gems/2.3.0/gems/unparser-0.2.4/lib
2017/11/13 10:58:22.076 (:1): C:/Ruby233p222-x64/lib/ruby/gems/2.3.0/gems/rainbow-2.2.2/lib
2017/11/13 10:58:22.076 (:1): C:/Ruby233p222-x64/lib/ruby/gems/2.3.0/extensions/x64-mingw32/2.3.0/rainbow-2.2.2
2017/11/13 10:58:22.076 (:1): C:/Ruby233p222-x64/lib/ruby/gems/2.3.0/gems/procto-0.0.3/lib
2017/11/13 10:58:22.076 (:1): C:/Ruby233p222-x64/lib/ruby/gems/2.3.0/gems/parser-2.2.3.0/lib
2017/11/13 10:58:22.076 (:1): C:/Ruby233p222-x64/lib/ruby/gems/2.3.0/gems/guard-rspec-4.7.3/lib
2017/11/13 10:58:22.076 (:1): C:/Ruby233p222-x64/lib/ruby/gems/2.3.0/gems/rspec-3.5.0/lib
2017/11/13 10:58:22.076 (:1): C:/Ruby233p222-x64/lib/ruby/gems/2.3.0/gems/rspec-mocks-3.5.0/lib
2017/11/13 10:58:22.076 (:1): C:/Ruby233p222-x64/lib/ruby/gems/2.3.0/gems/rspec-expectations-3.5.0/lib
2017/11/13 10:58:22.076 (:1): C:/Ruby233p222-x64/lib/ruby/gems/2.3.0/gems/rspec-core-3.5.4/lib
2017/11/13 10:58:22.076 (:1): C:/Ruby233p222-x64/lib/ruby/gems/2.3.0/gems/rspec-support-3.5.0/lib
2017/11/13 10:58:22.076 (:1): C:/Ruby233p222-x64/lib/ruby/gems/2.3.0/gems/guard-bundler-2.1.0/lib
2017/11/13 10:58:22.076 (:1): C:/Ruby233p222-x64/lib/ruby/gems/2.3.0/gems/guard-compat-1.2.1/lib
2017/11/13 10:58:22.076 (:1): C:/Ruby233p222-x64/lib/ruby/gems/2.3.0/gems/guard-2.14.1/lib
2017/11/13 10:58:22.076 (:1): C:/Ruby233p222-x64/lib/ruby/gems/2.3.0/gems/notiffany-0.1.1/lib
2017/11/13 10:58:22.076 (:1): C:/Ruby233p222-x64/lib/ruby/gems/2.3.0/gems/shellany-0.0.1/lib
2017/11/13 10:58:22.076 (:1): C:/Ruby233p222-x64/lib/ruby/gems/2.3.0/gems/nenv-0.3.0/lib
2017/11/13 10:58:22.076 (:1): C:/Ruby233p222-x64/lib/ruby/gems/2.3.0/gems/lumberjack-1.0.12/lib
2017/11/13 10:58:22.076 (:1): C:/Ruby233p222-x64/lib/ruby/gems/2.3.0/gems/listen-2.10.1/lib
2017/11/13 10:58:22.076 (:1): C:/Ruby233p222-x64/lib/ruby/gems/2.3.0/gems/rb-inotify-0.9.10/lib
2017/11/13 10:58:22.076 (:1): C:/Ruby233p222-x64/lib/ruby/gems/2.3.0/gems/rb-fsevent-0.10.2/lib
2017/11/13 10:58:22.076 (:1): C:/Ruby233p222-x64/lib/ruby/gems/2.3.0/gems/formatador-0.2.5/lib
2017/11/13 10:58:22.076 (:1): C:/Ruby233p222-x64/lib/ruby/gems/2.3.0/gems/flog-4.6.1/lib
2017/11/13 10:58:22.076 (:1): C:/Ruby233p222-x64/lib/ruby/gems/2.3.0/gems/flay-2.10.0/lib
2017/11/13 10:58:22.076 (:1): C:/Ruby233p222-x64/lib/ruby/gems/2.3.0/gems/ruby_parser-3.10.1/lib
2017/11/13 10:58:22.076 (:1): C:/Ruby233p222-x64/lib/ruby/gems/2.3.0/gems/sexp_processor-4.10.0/lib
2017/11/13 10:58:22.076 (:1): C:/Ruby233p222-x64/lib/ruby/gems/2.3.0/gems/path_expander-1.0.2/lib
2017/11/13 10:58:22.076 (:1): C:/Ruby233p222-x64/lib/ruby/gems/2.3.0/gems/ffi-1.9.18-x64-mingw32/lib
2017/11/13 10:58:22.076 (:1): C:/Ruby233p222-x64/lib/ruby/gems/2.3.0/gems/erubis-2.7.0/lib
2017/11/13 10:58:22.076 (:1): C:/Ruby233p222-x64/lib/ruby/gems/2.3.0/gems/diff-lcs-1.2.5/lib
2017/11/13 10:58:22.076 (:1): C:/Ruby233p222-x64/lib/ruby/gems/2.3.0/gems/coveralls-0.8.21/lib
2017/11/13 10:58:22.076 (:1): C:/Ruby233p222-x64/lib/ruby/gems/2.3.0/gems/thor-0.19.4/lib
2017/11/13 10:58:22.076 (:1): C:/Ruby233p222-x64/lib/ruby/gems/2.3.0/gems/term-ansicolor-1.6.0/lib
2017/11/13 10:58:22.076 (:1): C:/Ruby233p222-x64/lib/ruby/gems/2.3.0/gems/tins-1.15.0/lib
2017/11/13 10:58:22.076 (:1): C:/Ruby233p222-x64/lib/ruby/gems/2.3.0/gems/simplecov-0.14.1/lib
2017/11/13 10:58:22.076 (:1): C:/Ruby233p222-x64/lib/ruby/gems/2.3.0/gems/simplecov-html-0.10.2/lib
2017/11/13 10:58:22.076 (:1): C:/Ruby233p222-x64/lib/ruby/gems/2.3.0/gems/docile-1.1.5/lib
2017/11/13 10:58:22.076 (:1): C:/git/COSMOS/lib
2017/11/13 10:58:22.076 (:1): C:/git/extensions/x64-mingw32/2.3.0/cosmos-0.0.0
2017/11/13 10:58:22.076 (:1): C:/Ruby233p222-x64/lib/ruby/gems/2.3.0/gems/uuidtools-2.1.5/lib
2017/11/13 10:58:22.076 (:1): C:/Ruby233p222-x64/lib/ruby/gems/2.3.0/gems/snmp-1.2.0/lib
2017/11/13 10:58:22.076 (:1): C:/Ruby233p222-x64/lib/ruby/gems/2.3.0/gems/rubyzip-1.1.7/lib
2017/11/13 10:58:22.076 (:1): C:/Ruby233p222-x64/lib/ruby/gems/2.3.0/gems/rdoc-4.3.0/lib
2017/11/13 10:58:22.076 (:1): C:/Ruby233p222-x64/lib/ruby/gems/2.3.0/gems/rack-2.0.3/lib
2017/11/13 10:58:22.076 (:1): C:/Ruby233p222-x64/lib/ruby/gems/2.3.0/gems/qtbindings-4.8.6.3-x64-mingw32/lib
2017/11/13 10:58:22.076 (:1): C:/Ruby233p222-x64/lib/ruby/gems/2.3.0/gems/qtbindings-qt-4.8.6.3-x64-mingw32/qtlib
2017/11/13 10:58:22.076 (:1): C:/Ruby233p222-x64/lib/ruby/gems/2.3.0/gems/puma-3.10.0/lib
2017/11/13 10:58:22.076 (:1): C:/Ruby233p222-x64/lib/ruby/gems/2.3.0/extensions/x64-mingw32/2.3.0/puma-3.10.0
2017/11/13 10:58:22.076 (:1): C:/Ruby233p222-x64/lib/ruby/gems/2.3.0/gems/pry-doc-0.6.0/lib
2017/11/13 10:58:22.076 (:1): C:/Ruby233p222-x64/lib/ruby/gems/2.3.0/gems/yard-0.9.9/lib
2017/11/13 10:58:22.076 (:1): C:/Ruby233p222-x64/lib/ruby/gems/2.3.0/gems/pry-0.10.4/lib
2017/11/13 10:58:22.076 (:1): C:/Ruby233p222-x64/lib/ruby/gems/2.3.0/gems/slop-3.6.0/lib
2017/11/13 10:58:22.076 (:1): C:/Ruby233p222-x64/lib/ruby/gems/2.3.0/gems/method_source-0.8.2/lib
2017/11/13 10:58:22.076 (:1): C:/Ruby233p222-x64/lib/ruby/gems/2.3.0/gems/opengl-0.9.2-x64-mingw32/lib
2017/11/13 10:58:22.076 (:1): C:/Ruby233p222-x64/lib/ruby/gems/2.3.0/gems/nokogiri-1.8.1-x64-mingw32/lib
2017/11/13 10:58:22.076 (:1): C:/Ruby233p222-x64/lib/ruby/gems/2.3.0/gems/mini_portile2-2.3.0/lib
2017/11/13 10:58:22.076 (:1): C:/Ruby233p222-x64/lib/ruby/gems/2.3.0/gems/json-1.8.6/lib
2017/11/13 10:58:22.076 (:1): C:/Ruby233p222-x64/lib/ruby/gems/2.3.0/extensions/x64-mingw32/2.3.0/json-1.8.6
2017/11/13 10:58:22.076 (:1): C:/Ruby233p222-x64/lib/ruby/gems/2.3.0/gems/httpclient-2.8.3/lib
2017/11/13 10:58:22.076 (:1): C:/Ruby233p222-x64/lib/ruby/gems/2.3.0/gems/concord-0.1.5/lib
2017/11/13 10:58:22.076 (:1): C:/Ruby233p222-x64/lib/ruby/gems/2.3.0/gems/equalizer-0.0.11/lib
2017/11/13 10:58:22.076 (:1): C:/Ruby233p222-x64/lib/ruby/gems/2.3.0/gems/coderay-1.1.2/lib
2017/11/13 10:58:22.076 (:1): C:/Ruby233p222-x64/lib/ruby/gems/2.3.0/gems/celluloid-0.16.0/lib
2017/11/13 10:58:22.076 (:1): C:/Ruby233p222-x64/lib/ruby/gems/2.3.0/gems/timers-4.0.4/lib
2017/11/13 10:58:22.076 (:1): C:/Ruby233p222-x64/lib/ruby/gems/2.3.0/gems/hitimes-1.2.6/lib
2017/11/13 10:58:22.076 (:1): C:/Ruby233p222-x64/lib/ruby/gems/2.3.0/extensions/x64-mingw32/2.3.0/hitimes-1.2.6
2017/11/13 10:58:22.076 (:1): C:/Ruby233p222-x64/lib/ruby/gems/2.3.0/gems/benchmark-ips-2.7.2/lib
2017/11/13 10:58:22.076 (:1): C:/Ruby233p222-x64/lib/ruby/gems/2.3.0/gems/ast-2.3.0/lib
2017/11/13 10:58:22.076 (:1): C:/Ruby233p222-x64/lib/ruby/gems/2.3.0/gems/adamantium-0.2.0/lib
2017/11/13 10:58:22.076 (:1): C:/Ruby233p222-x64/lib/ruby/gems/2.3.0/gems/memoizable-0.4.2/lib
2017/11/13 10:58:22.076 (:1): C:/Ruby233p222-x64/lib/ruby/gems/2.3.0/gems/thread_safe-0.3.6/lib
2017/11/13 10:58:22.076 (:1): C:/Ruby233p222-x64/lib/ruby/gems/2.3.0/gems/ice_nine-0.11.2/lib
2017/11/13 10:58:22.076 (:1): C:/Ruby233p222-x64/lib/ruby/gems/2.3.0/gems/abstract_type-0.0.7/lib
2017/11/13 10:58:22.076 (:1): C:/Ruby233p222-x64/lib/ruby/gems/2.3.0/gems/rake-12.1.0/lib
2017/11/13 10:58:22.076 (:1): C:/Ruby233p222-x64/lib/ruby/site_ruby/2.3.0
2017/11/13 10:58:22.076 (:1): C:/Ruby233p222-x64/lib/ruby/site_ruby/2.3.0/x64-msvcrt
2017/11/13 10:58:22.076 (:1): C:/Ruby233p222-x64/lib/ruby/site_ruby
2017/11/13 10:58:22.076 (:1): C:/Ruby233p222-x64/lib/ruby/vendor_ruby/2.3.0
2017/11/13 10:58:22.076 (:1): C:/Ruby233p222-x64/lib/ruby/vendor_ruby/2.3.0/x64-msvcrt
2017/11/13 10:58:22.076 (:1): C:/Ruby233p222-x64/lib/ruby/vendor_ruby
2017/11/13 10:58:22.076 (:1): C:/Ruby233p222-x64/lib/ruby/2.3.0
2017/11/13 10:58:22.076 (:1): C:/Ruby233p222-x64/lib/ruby/2.3.0/x64-mingw32
2017/11/13 10:58:22.076 (:1): C:/Ruby233p222-x64/lib/ruby/gems/2.3.0/gems/qtbindings-4.8.6.3-x64-mingw32/lib/../lib/2.3
2017/11/13 10:58:22.076 (:1): C:/git/COSMOS/demo/config/targets/INST/lib
2017/11/13 10:58:22.076 (:1): C:/git/COSMOS/demo/config/targets/INST/procedures
2017/11/13 10:58:22.076 (:1): C:/git/COSMOS/demo/config/targets/EXAMPLE/lib
2017/11/13 10:58:22.076 (:1): C:/git/COSMOS/demo/config/targets/TEMPLATED/lib
2017/11/13 10:58:22.076 (:1): C:/git/COSMOS/demo/config/targets/SYSTEM/lib
2017/11/13 10:58:22.092 (SCRIPTRUNNER): Script completed:
Wow, that is a lot of gems! COSMOS requires a lot of libraries to support how it operates including many used for development purposes like rspec and simplecov. An important thing to note is at the top of the list the following paths are listed.
C:/git/COSMOS/demo/procedures
C:/git/COSMOS/demo/lib
The first path is due to the following line in the COSMOS Demo configuration’s system.txt configuration file: PATH PROCEDURES ./procedures. This adds the procedures directory in the current COSMOS configuration (C:/git/COSMOS/demo on my machine) to the path.
The second path is added to every COSMOS configuration. The lib directory in the current COSMOS configuration (C:/git/COSMOS/demo on my machine).
You should also note the last few lines of the $LOAD_PATH.
C:/git/COSMOS/demo/config/targets/INST/lib
C:/git/COSMOS/demo/config/targets/INST/procedures
C:/git/COSMOS/demo/config/targets/EXAMPLE/lib
C:/git/COSMOS/demo/config/targets/TEMPLATED/lib
C:/git/COSMOS/demo/config/targets/SYSTEM/lib
These are added because COSMOS automatically adds the lib and procedures directory from each Target folder. Thus you are able to directly load a file in the INST/procedures directory by doing “load ‘checks.rb’” (for example). If a file is in a subdirectory like the INST/procedures/utilities directory, then you must specify the additional subpath such as “load_utility ‘utilities/clear.rb’”.
Just for completeness note that there is also a Ruby keyword called require_relative. This works similar to require but instead of using the LOAD_PATH as described above, it looks relative to the current executing file. This should rarely be needed in COSMOS except perhaps in test files.
If you have a question which would benefit the community or find a possible bug please use our Github Issues.
COSMOS gained a new tool in the 4.0.0 release called Configuration Editor. This tool provides contextual help when editing COSMOS configuration files and thus should make configuring COSMOS much easier than in the past.
When creating a new project from from the Demo you’ll notice a new icon in the Launcher under the Utilities label:

Note that as of this post the Install Launcher does not have the new Configuration Editor or Command Sequence buttons but this will be addressed in the next release.
Clicking the Config Editor button brings up the Configuration Editor tool:
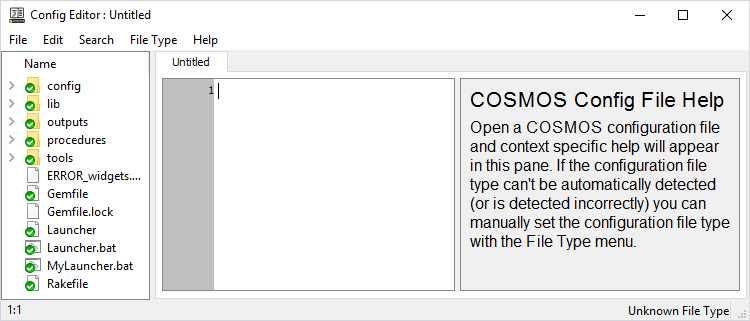
Configuration Editor has three vertical panes. The far left is a Windows Explorer type tree view which opens at the base of your COSMOS configuration. This makes it easy to see and navigate through all the COSMOS configuration files.
The middle pane is a file editor which opens files when they are clicked on in the left pane tree view.
The right pane is what Configuration Editor was created for. It provides contextual help for all the COSMOS keywords. As the editor cursor in the middle pane changes the contextual help changes to reflect current editor line. Here’s an example of the right pane when the Demo’s INST target’s command definition is edited:
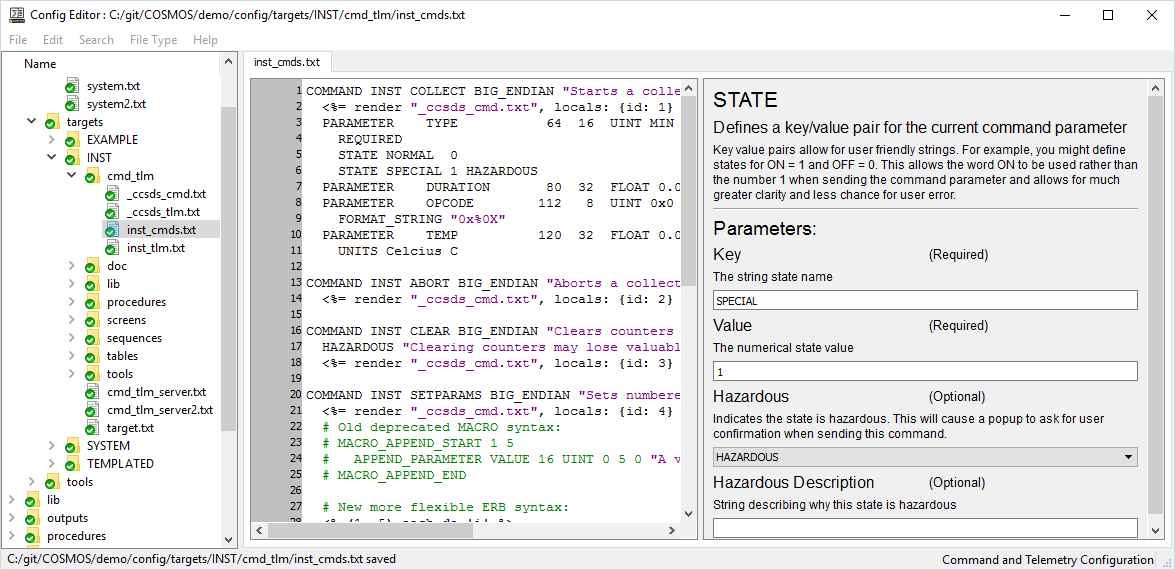
The user can either edit the configuration file directly in the middle pane or use the configuration help in the right pane. Edits in the middle pane are immediately reflected in the right pane. Edits in the right pane are not reflected back in the configuration pane until the user tabs or clicks to another field. Note that tabbing through the fields is a quick way to transition from one parameter to another.
Configuration Editor contains the same Edit and Search menu options that Script Runner supports. Searching for keywords and transitioning from one to another also updates the configuration help pane which is another way to quickly check particular keywords.
If you have an older (pre-4.0) COSMOS configuration or generated a basic configuration from the install (4.0.0-4.0.3) you will not have a link to the new Configuration Editor tool in your Launcher. Follow the following steps to add this tool.
TOOL "Config Editor" "LAUNCH ConfigEditor" "config_editor.png"
Restart your Launcher and you should see this new tool to help you configure COSMOS. Note that if you don’t have the Configuration Editor button then you probably also don’t have a button for the new Command Sequence tool. Add the following line after the Command Sender line to access this tool:
TOOL "Command Sequence" "LAUNCH CmdSequence" "cmd_sequence.png"
Enjoy these new COSMOS 4.0 tools!
If you have a question which would benefit the community or find a possible bug please use our Github Issues.
Important Bug Fix: UdpInterface was only working for locahost on earlier versions of COSMOS 4.0.x. Please upgrade to COSMOS 4.0.3 if you need support for UDP.
None
COSMOS 4 includes several breaking changes from the COSMOS 3.x series.
The first and simplest is that the Command and Telemetry Server now opens an additional port at 7780 by default, that provides a router that will send out each command that the system has sent. This can allow external systems to also log all commands sent by COSMOS. For most people this change will be transparent and no updates to your COSMOS configuration will be required.
The second is that the Command and Telemetry Server now always supports a meta data packet called SYSTEM META. This packet will always contain the MD5 sum for the current running COSMOS configuration, the version of COSMOS running, the version of your COSMOS Project, and the version of Ruby being used. You can also add your own requirements for meta data with things like the name of the operator currently running the system, or the name of a specific test you are currently running. In general you shouldn’t need to do anything for this change unless you were using the previous metadata functionality in COSMOS. If you were, then you will need to migrate your meta data to the new SYSTEM META packet, and change the parameters in your CmdTlmServer or TestRunner configurations regarding meta data. If you weren’t using metadata before, then you will probably just notice this new packet in your log files, and in your telemetry stream.
Finally the most exciting breaking change is in how COSMOS interfaces handle protocols. Before, the COSMOS TCP/IP and Serial interface classes each took a protocol like LENGTH, TERMINATED, etc that defined how packets were delineated by the interface. Now each interface can take a set of one or more protocols. This allows COSMOS to much more easily support nested protocols, such as the frame focused protocols of CCSDS. It also allows for creating helpful reusable protocols such as the new CRC protocol for automatically adding CRCs to outgoing commands and verifying incoming CRCs on telemetry packets. It’s a great change, but if you have any custom interface classes you have written, they will probably require some modification. See the Interfaces section at cosmosc2.com to see how the new interface classes work. We will also be writing up a blog post to help document the process of upgrading. Look for this in a week or two.
To upgrade to the latest version of COSMOS, run “bundle update cosmos” in your COSMOS project folder.
Important Bug Fix: UdpInterface was only working for locahost on earlier versions of COSMOS 4.0.x. Please upgrade to COSMOS 4.0.2 if you need support for UDP.
COSMOS 4 includes several breaking changes from the COSMOS 3.x series.
The first and simplest is that the Command and Telemetry Server now opens an additional port at 7780 by default, that provides a router that will send out each command that the system has sent. This can allow external systems to also log all commands sent by COSMOS. For most people this change will be transparent and no updates to your COSMOS configuration will be required.
The second is that the Command and Telemetry Server now always supports a meta data packet called SYSTEM META. This packet will always contain the MD5 sum for the current running COSMOS configuration, the version of COSMOS running, the version of your COSMOS Project, and the version of Ruby being used. You can also add your own requirements for meta data with things like the name of the operator currently running the system, or the name of a specific test you are currently running. In general you shouldn’t need to do anything for this change unless you were using the previous metadata functionality in COSMOS. If you were, then you will need to migrate your meta data to the new SYSTEM META packet, and change the parameters in your CmdTlmServer or TestRunner configurations regarding meta data. If you weren’t using metadata before, then you will probably just notice this new packet in your log files, and in your telemetry stream.
Finally the most exciting breaking change is in how COSMOS interfaces handle protocols. Before, the COSMOS TCP/IP and Serial interface classes each took a protocol like LENGTH, TERMINATED, etc that defined how packets were delineated by the interface. Now each interface can take a set of one or more protocols. This allows COSMOS to much more easily support nested protocols, such as the frame focused protocols of CCSDS. It also allows for creating helpful reusable protocols such as the new CRC protocol for automatically adding CRCs to outgoing commands and verifying incoming CRCs on telemetry packets. It’s a great change, but if you have any custom interface classes you have written, they will probably require some modification. See the Interfaces section at cosmosc2.com to see how the new interface classes work. We will also be writing up a blog post to help document the process of upgrading. Look for this in a week or two.
To upgrade to the latest version of COSMOS, run “bundle update cosmos” in your COSMOS project folder.
COSMOS is a GUI application which runs equally well on Windows, Linux, and Mac OS X due to the QT GUI framework and Ruby language it is written in. Traditionally this means you install it locally on your own workstation and you’re off and running. But can COSMOS also be deployed to the cloud? Yes! This post describes how I deployed COSMOS to Amazon Web Services (AWS) using several different technologies.
AWS consists of a lot of different services. To deploy COSMOS you need to create an AWS EC2 instance. The first step is to sign up for AWS which enables you to use their Free Tier for 12 months. This includes 750hrs each on Linux and Windows Server.
Deploying to Windows Server is probably the easiest way to get COSMOS in the cloud. Simply create a Windows Server instance by selecting the following image:

Then select the t2.micro Type which is marked “Free tier eligible”. Launch the Instance and you should see the key pair dialog:
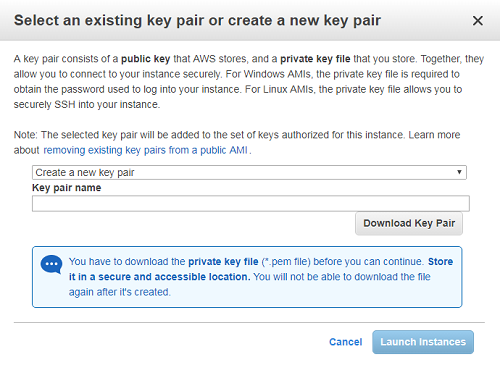
Create a new key pair and give the name something generic because you can use the same key pair for all the EC2 instances you create. Create the instance and then View Instance which will show the instance status. Click the Connect button at top which will bring up the Connect dialog:
Click the Download Remote Desktop File and open it in Remote Desktop to connect to the Windows Server instance. Note that it does take a while for the Windows instance to boot so this won’t work until your Status Checks show a green check. Also note that many corporate firewalls may block doing a Remote Desktop outside your corporate network.
You also need to click Get Password and locate your ‘pem’ file you saved earlier to Decrypt your password. Login to the instance as Administrator with the decrypted password. Once you’ve logged in you can change the password to something a little more reasonable. Then simply follow the usual COSMOS installation instructions.
Here is a screenshot of my successful COSMOS installation running on the AWS Microsoft Server instance:
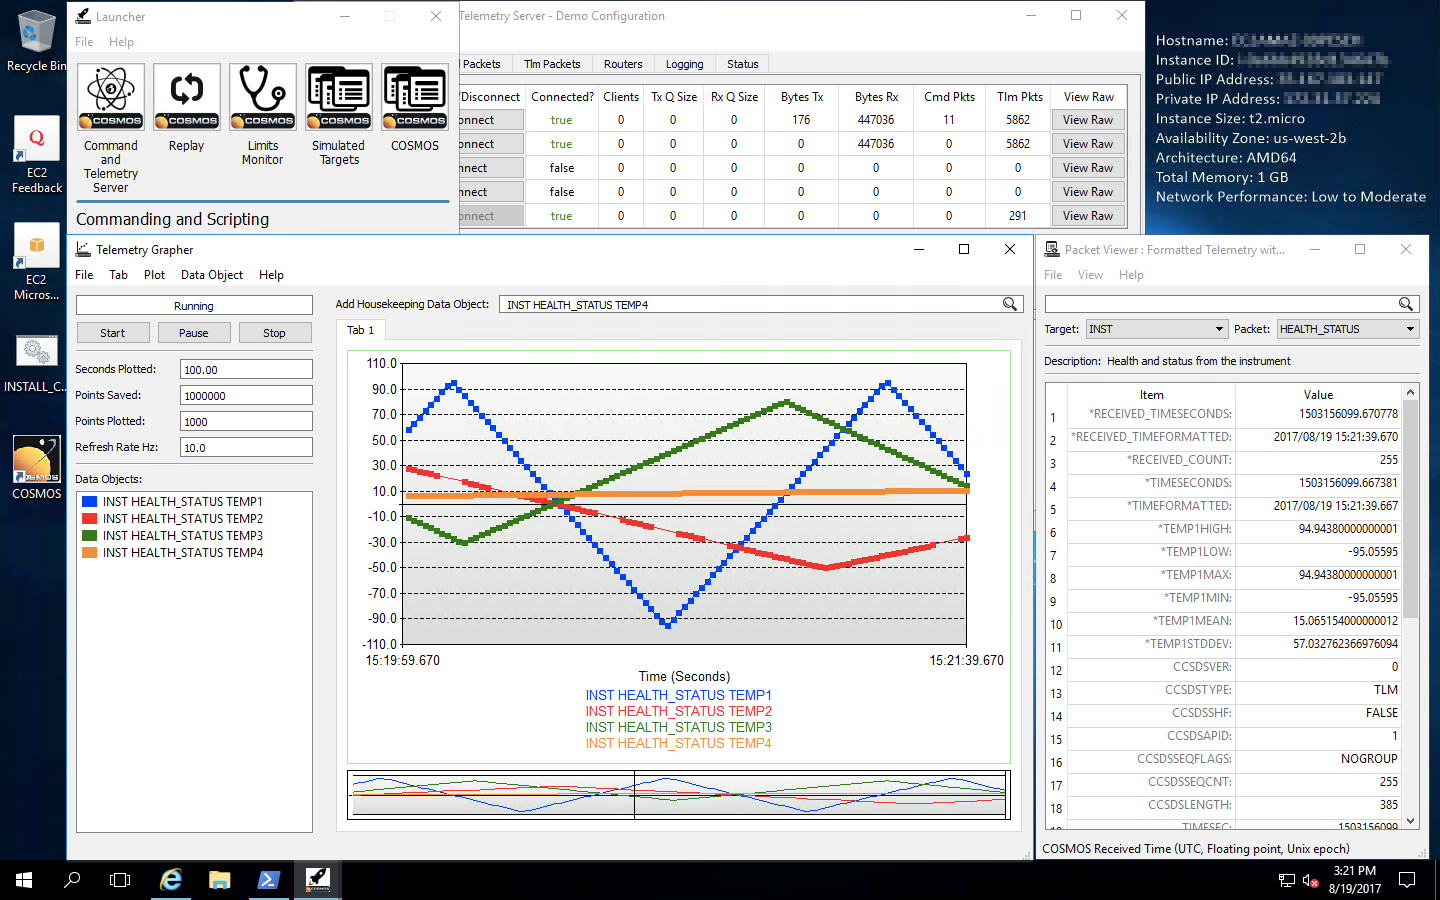
Deploying to Red Hat Linux is similar to Windows. Create a Red Hat instance by selecting the following image:

Use the same key pair when creating your Windows instance and create the instance. View Instance and click the Connect button which brings up the Connect dialog:
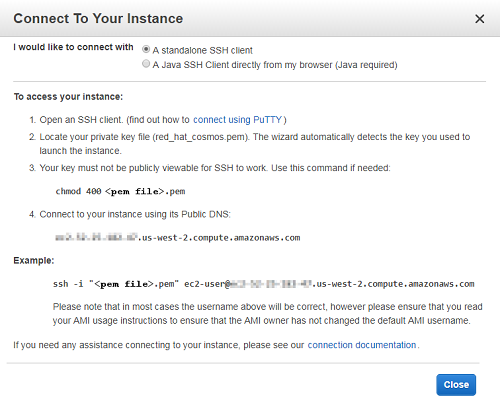
SSH to the instance using the connection string provided making sure to specify the full path to your ‘pem’ file in the quoted path after the -i option. Install a GUI by issuing the following command:
sudo yum groupinstall 'Server with GUI'
Install COSMOS using the installation bash file:
bash <(\curl -sSL https://raw.githubusercontent.com/BallAerospace/COSMOS/cosmos4/vendor/installers/linux_mac/INSTALL_COSMOS.sh)
Chose the sudo option when asked how to install. To enable X forwarding edit the SSH config file:
sudo vim /etc/ssh/sshd_config
Enable the following settings:
X11Forwarding yes
X11DisplayOffset 10
X11UseLocalhost no
Close your current SSH connection and reconnect with SSH adding the -X option to enable X11 forwarding and -Y to enable trusted X11 fowarding. If you host OS is Mac OS X you’ll need to install XQuartz. Linux has X11 forward support built-in. Windows should probably install Xming which is an exercise left to the reader.
Now launch COSMOS and you should see the COSMOS windows appear on your own machine. While this approach works I found the performance to be significantly slower than VNC. Here is a screenshot of it running while I connected via a Mac OS X machine:
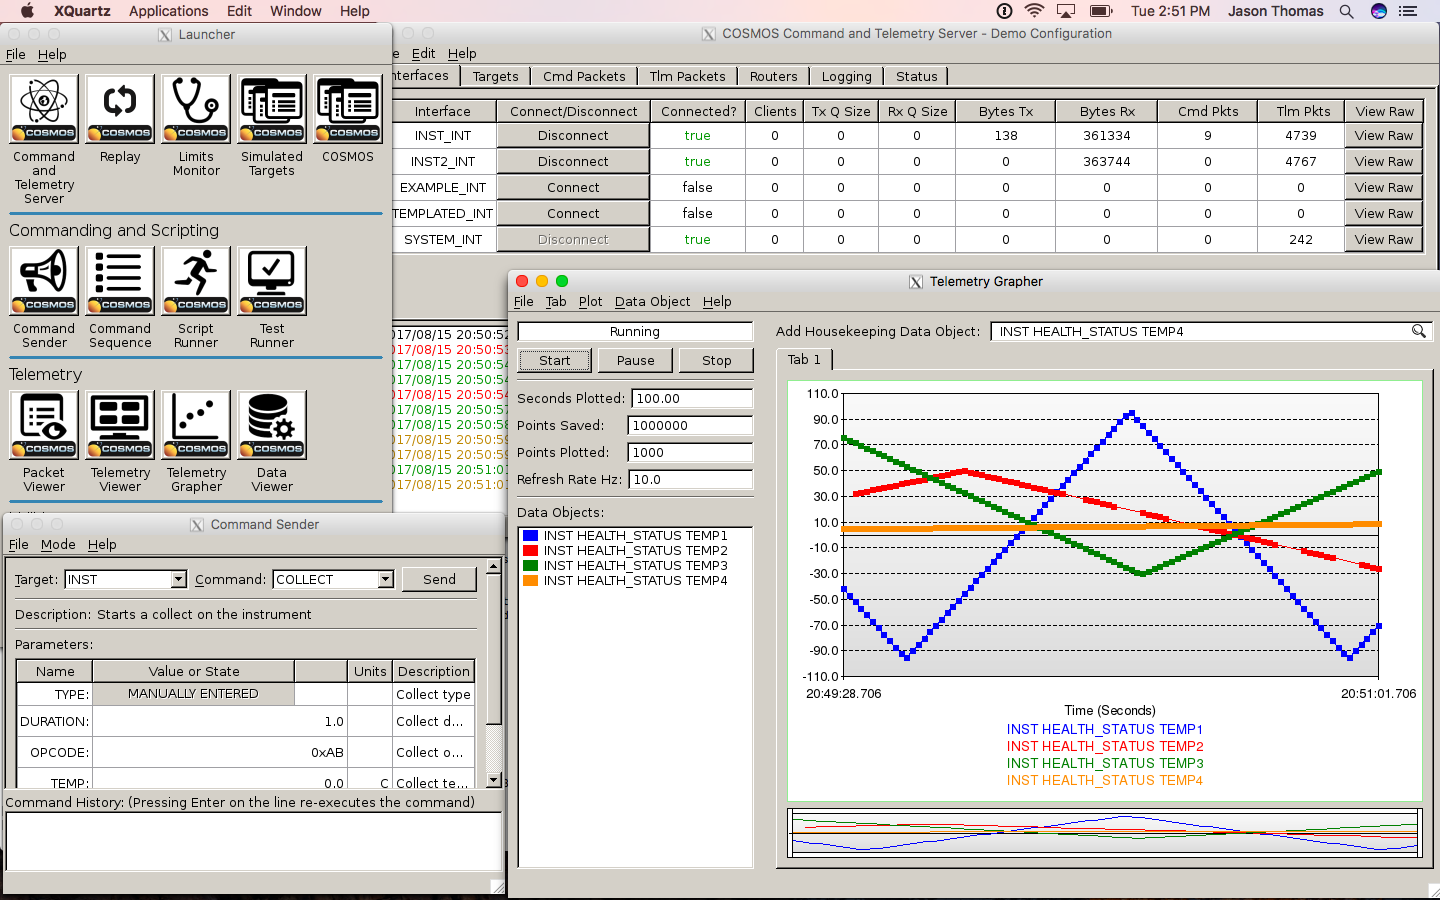
Deploying to Ubuntu Linux is very similar to Red Hat. Create an Ubuntu instance by selecting the following image:

Use the same key pair as when creating your Windows or Red Hat instance and create the instance. View Instance and click the Connect button which brings up the Connect dialog:
Click on the instance and click the Description tab which appears below the instance. Click the link next to Security groups to open the Security Groups configuration. Click the Inbound tab and create Edit to create a new Custom TCP Rule to enable TCP traffic on Ports 5900-5910 from Anywhere. Your rule should look like the following:
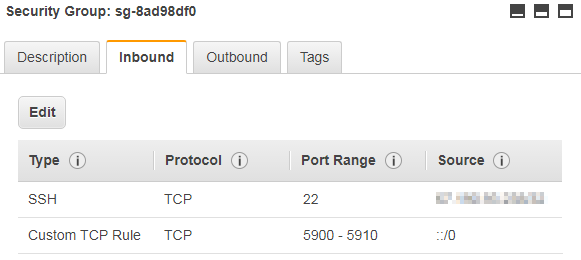
SSH to the instance using the connection string provided making sure to specify the full path to your ‘pem’ file in the quoted path after the -i option. Install a GUI by issuing the following command:
sudo apt-get update
sudo apt install xfce4 xfce4-goodies tightvncserver
Run the following commands to setup the VNC server:
vncserver
vncserver -kill :1
vim ~/.vnc/xstartup
Ensure your xstartup file matches the following:
#!/bin/sh

# Uncomment the following two lines for normal desktop:
unset SESSION_MANAGER
# exec /etc/X11/xinit/xinitrc
unset DBUS_SESSION_BUS_ADDRESS
startxfce4 &

[ -x /etc/vnc/xstartup ] && exec /etc/vnc/xstartup
[ -r $HOME/.Xresources ] && xrdb $HOME/.Xresources
xsetroot -solid grey
vncconfig -iconic &
#x-terminal-emulator -geometry 80x24+10+10 -ls -title "$VNCDESKTOP Desktop" &
#x-window-manager &
Restart VNC:
vncserver
Install COSMOS using the installation bash file:
bash <(\curl -sSL https://raw.githubusercontent.com/BallAerospace/COSMOS/cosmos4/vendor/installers/linux_mac/INSTALL_COSMOS.sh)
Chose the sudo option when asked how to install. On your local machine install a VNC viewer such as TightVNC and connect by entering the Public DNS address of your AWS instance in the Remote Host as well as the Port number of 5901. Typically this is added by appending it to the Remote Host address with a colon. Here is a screenshot of it running while I connected via TightVNC:
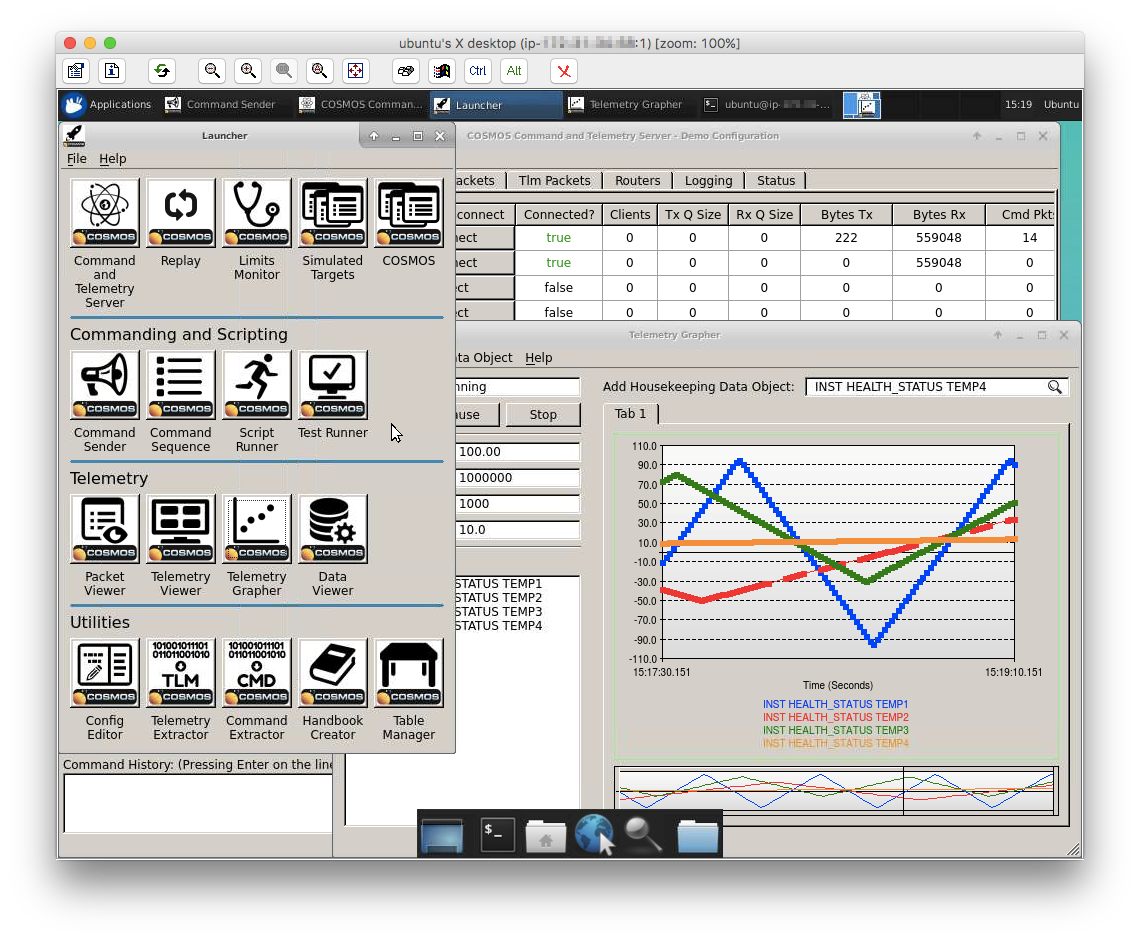
If you have a question which would benefit the community or find a possible bug please use our Github Issues.
COSMOS 4 includes several breaking changes from the COSMOS 3.x series.
The first and simplest is that the Command and Telemetry Server now opens an additional port at 7780 by default, that provides a router that will send out each command that the system has sent. This can allow external systems to also log all commands sent by COSMOS. For most people this change will be transparent and no updates to your COSMOS configuration will be required.
The second is that the Command and Telemetry Server now always supports a meta data packet called SYSTEM META. This packet will always contain the MD5 sum for the current running COSMOS configuration, the version of COSMOS running, the version of your COSMOS Project, and the version of Ruby being used. You can also add your own requirements for meta data with things like the name of the operator currently running the system, or the name of a specific test you are currently running. In general you shouldn’t need to do anything for this change unless you were using the previous metadata functionality in COSMOS. If you were, then you will need to migrate your meta data to the new SYSTEM META packet, and change the parameters in your CmdTlmServer or TestRunner configurations regarding meta data. If you weren’t using metadata before, then you will probably just notice this new packet in your log files, and in your telemetry stream.
Finally the most exciting breaking change is in how COSMOS interfaces handle protocols. Before, the COSMOS TCP/IP and Serial interface classes each took a protocol like LENGTH, TERMINATED, etc that defined how packets were delineated by the interface. Now each interface can take a set of one or more protocols. This allows COSMOS to much more easily support nested protocols, such as the frame focused protocols of CCSDS. It also allows for creating helpful reusable protocols such as the new CRC protocol for automatically adding CRCs to outgoing commands and verifying incoming CRCs on telemetry packets. It’s a great change, but if you have any custom interface classes you have written, they will probably require some modification. See the Interfaces section at cosmosc2.com to see how the new interface classes work. We will also be writing up a blog post to help document the process of upgrading. Look for this in a week or two.
To upgrade to the latest version of COSMOS, run “bundle update cosmos” in your COSMOS project folder.
COSMOS 4 is here!
48 tickets have gone into this release, and it brings with it two new tools and some great under the hood improvements.
New Tools:
COSMOS now has a dedicated Configuration Editor and Command Sequence Builder.
The config editor gives you contextual help when building config files, and make it super easy to define packets and configure tools without having to have the online documentation up in front of you. It’s going to make setting up COSMOS even easier than it was before.
Command Sequence builder allows you to define series of commands that should be sent at either absolute or relative timestamps to each other. This is great for planning time specific commanding. You can execute these on the ground directly from the tool, or you can convert them to your own internal format and upload to the system you are commanding.
Highlighted changes:
COSMOS 4 includes several breaking changes from the COSMOS 3.x series.
The first and simplest is that the Command and Telemetry Server now opens an additional port at 7780 by default, that provides a router that will send out each command that the system has sent. This can allow external systems to also log all commands sent by COSMOS. For most people this change will be transparent and no updates to your COSMOS configuration will be required.
The second is that the Command and Telemetry Server now always supports a meta data packet called SYSTEM META. This packet will always contain the MD5 sum for the current running COSMOS configuration, the version of COSMOS running, the version of your COSMOS Project, and the version of Ruby being used. You can also add your own requirements for meta data with things like the name of the operator currently running the system, or the name of a specific test you are currently running. In general you shouldn’t need to do anything for this change unless you were using the previous metadata functionality in COSMOS. If you were, then you will need to migrate your meta data to the new SYSTEM META packet, and change the parameters in your CmdTlmServer or TestRunner configurations regarding meta data. If you weren’t using metadata before, then you will probably just notice this new packet in your log files, and in your telemetry stream.
Finally the most exciting breaking change is in how COSMOS interfaces handle protocols. Before, the COSMOS TCP/IP and Serial interface classes each took a protocol like LENGTH, TERMINATED, etc that defined how packets were delineated by the interface. Now each interface can take a set of one or more protocols. This allows COSMOS to much more easily support nested protocols, such as the frame focused protocols of CCSDS. It also allows for creating helpful reusable protocols such as the new CRC protocol for automatically adding CRCs to outgoing commands and verifying incoming CRCs on telemetry packets. It’s a great change, but if you have any custom interface classes you have written, they will probably require some modification. See the Interfaces section at cosmosc2.com to see how the new interface classes work. We will also be writing up a blog post to help document the process of upgrading. Look for this in a week or two.
To upgrade to the latest version of COSMOS, run “bundle update cosmos” in your COSMOS project folder.
Ball Aerospace COSMOS has been featured in a blog post by William Osman about creating a telemetry system for a race car. William mentions first seeing COSMOS in action on the set of Battle Bots Season 2 where Team Chomp was using it enroute to their quarterfinal finish. What an awesome example of COSMOS in action!
The Template Protocol is probably one of the more confusing protocols in the COSMOS protocol library but it is extremely helpful when implementing string based protocols such as Standard Commands for Programmable Instruments (SCPI; often pronounced “skippy”).
For this example we’ll assume we’re trying to talk to a SCPI enabled power supply such as the Keysight N6700. We start by creating a directory under our config/targets called POWER. The supply has a TCP/IP interface so we’ll use the TCP/IP Client Interface to connect to it. Thus we create our POWER/cmd_tlm_server.txt file as follows:
INTERFACE POWER_INT tcpip_client_interface.rb 127.0.0.1 5025 5025 10.0 nil TEMPLATE 0x0A 0x0A
  TARGET POWER
This definition declares an interface named POWER_INT using the TCP/IP client interface which connects to ‘127.0.0.1’ (obviously you’ll change this to your actual power supply IP addres) using a write and read port of 5025 (standard SCPI ports for Keysight instruments) with a write timeout of 10s and no read timeout (block on read). We specify the TEMPLATE protocol with both write and read termination characters of 0x0A (ASCII newline). Note the TEMPLATE protocol takes many additional parameters to allow you to work with off nominal protocol conditions.
Now you can define your target’s command and telemetry definitions. We’ll create example commands which get and set the voltage setting in our power supply. Create a POWER/cmd_tlm/cmd.txt file which has the following:
COMMAND POWER GET_VOLTAGE BIG_ENDIAN "Get voltage"
  APPEND_ID_PARAMETER CMD_ID 8 UINT 1 1 1 "Command Id" # Unique command ID
  APPEND_PARAMETER CHANNEL 8 UINT 1 4 1 "Channel"
  APPEND_PARAMETER CMD_TEMPLATE 512 STRING "MEAS:VOLT? (@<CHANNEL>)"
  APPEND_PARAMETER RSP_TEMPLATE 512 STRING "<VOLTAGE>"
  APPEND_PARAMETER RSP_PACKET 512 STRING "TLM"

COMMAND POWER SET_VOLTAGE BIG_ENDIAN "Set voltage"
  APPEND_ID_PARAMETER CMD_ID 8 UINT 2 2 2 "Command Id" # Unique command ID
  APPEND_PARAMETER CHANNEL 8 UINT 1 4 1 "Channel"
  APPEND_PARAMETER VOLTAGE 8 UINT 0 100 10 "Voltage"
  APPEND_PARAMETER CMD_TEMPLATE 512 STRING "VOLT <VOLTAGE>,(@<CHANNEL>)"
  APPEND_PARAMETER RSP_TEMPLATE 512 STRING "<SET_VOLTAGE>"
  APPEND_PARAMETER RSP_PACKET 512 STRING "TLM"
The CMD_ID parameter is defined by APPEND_ID_PARAMETER. This ID parameter is not used by the SCPI protocol but is needed for COSMOS to identify the command when it is logged. The CMD_TEMPLATE parameter is the actual SCPI command which is being sent to the target. Anything inside brackets <> will be replaced by the value in the named parameter. For example, both commands define the CHANNEL parameter and thus <CHANNEL> will be replaced by the value of that parameter when constructing the command. The RSP_TEMPLATE is the expected string response back from the target. This is parsed by pulling out values into the bracket delimited values. The RSP_PACKET defines the packet where the bracket delimited values are defined. So for our GET_VOLTAGE example we parse the VOLTAGE value and place it in the TLM packet.
Create a POWER/cmd_tlm/tlm.txt file to define the response telemetry:
TELEMETRY POWER TLM BIG_ENDIAN "Power Supply Telemetry"
  APPEND_ID_ITEM TLM_ID 32 INT 1 "Packet Identifier" # Unique telemetry ID
  APPEND_ITEM VOLTAGE 32 FLOAT "PS Measured Voltage"
    FORMAT_STRING "%0.3f"
    UNITS "Volts" "V"
  APPEND_ITEM SET_VOLTAGE 32 FLOAT "PS Set Voltage"
    FORMAT_STRING "%0.3f"
    UNITS "Volts" "V"
The TLM_ID item is defined by APPEND_ID_ITEM. This ID item is not used by the SCPI protocol but is needed by COSMOS to decode this logged telemetry packet. The packet is named TLM which matches our RSP_PACKET definition in the commands. We define VOLTAGE and SET_VOLTAGE which also match the values used in the RSP_TEMPLATE parameters in our commands.
With Keysight supplies you can string together a bunch of SCIP commands in one CMD_TEMPLATE if you delimit them with semicolons. Then in the RSP_TEMPLATE you can break the response apart and set a bunch of telemetry items at once. For example:
COMMAND POWER GET_STATUS BIG_ENDIAN "Get status"
  APPEND_ID_PARAMETER CMD_ID 8 UINT 3 3 3 "Command Id" # Unique command ID
  APPEND_PARAMETER CHANNEL 8 UINT 1 4 1 "Channel"
  APPEND_PARAMETER CMD_TEMPLATE 512 STRING "MEAS:VOLT (@<CHANNEL>);CURR (@<CHANNEL>);POW (@<CHANNEL>)"
  APPEND_PARAMETER RSP_TEMPLATE 512 STRING "<VOLTAGE>,<CURRENT>,<POWER>"
  APPEND_PARAMETER RSP_PACKET 512 STRING "TLM"
The RSP_TEMPLATE expects to have three values delimited by the comma character. For this example to be complete you would also need to declare CURRENT and POWER items in the TLM packet.
Using the TEMPLATE processor can be complex but makes working with with string based command / response protocols like SCPI much easier.
If you have a question which would benefit the community or find a possible bug please use our Github Issues.
None
The Table Manager configuration file format has changed. Documentation will updated the first week of April.
You can migrate existing config files using:
bundle exec ruby tools\TableManager --convert config\tools\table_manager\old_table_def.txt
To upgrade to the latest version of COSMOS, run “bundle update cosmos” in your COSMOS project folder.
COSMOS Packet Processors are a powerful concept that allow you to run code each time a specified packet is received. COSMOS provides a few generic Packet Processors which allows you to include statistics about individual telemetry points in your defined packets. Let’s break down how the COSMOS included processors are used and how you can implement your own Packet Processor.
First install COSMOS and start up the demo application. You’ll notice we declare a few targets of which one is called INST (for instrument). If you open up Packet Viewer and navigate to the INST target and the HEALTH_STATUS packet you can see a bunch of derived telemetry points at the top.
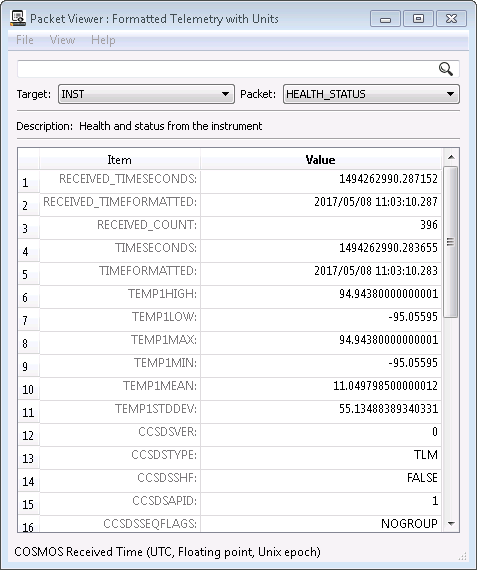
These points aren’t immediately obvious in the GUI (Ticket #441) but here they include all the items down to and including TEMP1STDDEV. If you right click on one of them and choose “Details” you can see that Data Type is DERVIED.
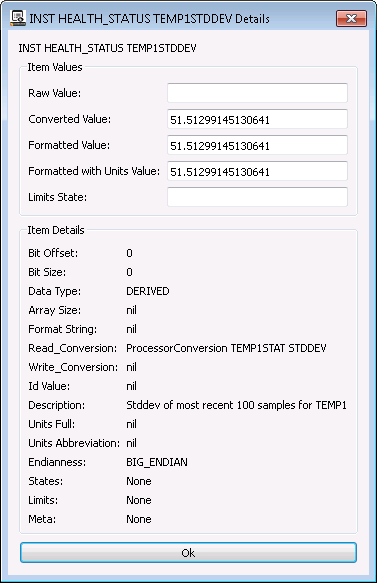
This is all controlled by the INST target’s cmd/tlm definition files. If you open the INST/cmd_tlm/inst_tlm.txt file from the demo you’ll see the following at the end of the HEALTH_STATUS packet definition:
  ITEM TEMP1HIGH 0 0 DERIVED "High-water mark for TEMP1"
    READ_CONVERSION processor_conversion.rb TEMP1WATER HIGH_WATER
  ITEM TEMP1LOW 0 0 DERIVED "Low-water mark for TEMP1"
    READ_CONVERSION processor_conversion.rb TEMP1WATER LOW_WATER
  ITEM TEMP1MAX 0 0 DERIVED "Maximum of most recent 100 samples for TEMP1"
    READ_CONVERSION processor_conversion.rb TEMP1STAT MAX
  ITEM TEMP1MIN 0 0 DERIVED "Minimum of most recent 100 samples for TEMP1"
    READ_CONVERSION processor_conversion.rb TEMP1STAT MIN
  ITEM TEMP1MEAN 0 0 DERIVED "Mean of most recent 100 samples for TEMP1"
    READ_CONVERSION processor_conversion.rb TEMP1STAT MEAN
  ITEM TEMP1STDDEV 0 0 DERIVED "Stddev of most recent 100 samples for TEMP1"
    READ_CONVERSION processor_conversion.rb TEMP1STAT STDDEV
  PROCESSOR TEMP1STAT statistics_processor.rb TEMP1 100
  PROCESSOR TEMP1WATER watermark_processor.rb TEMP1
These definitions create six new telemetry ITEMs. The READ_CONVERSION line takes a conversion class and then variable parameters that are passed to the class. Here we’re using the COSMOS provided processor_conversion.rb class which pulls a result calculated by a PROCESSOR. The last two lines define the two PROCESSORs.
Currently COSMOS provides the following three processors:
If all you want to do is to calculate useful statistics on your telemetry items you can stop reading now. For those who want to know how this works or want to implement their own Packet Processors, let’s continue into the source code.
require 'cosmos/processors/processor'
module Cosmos
  class WatermarkProcessor < Processor
    # @param item_name [String] The name of the item to gather statistics on
    # @param value_type #See Processor::initialize
    def initialize(item_name, value_type = :CONVERTED)
      super(value_type)
      @item_name = item_name.to_s.upcase
      reset()
    end

    # See Processor#call
    def call(packet, buffer)
      value = packet.read(@item_name, @value_type, buffer)
      high_water = @results[:HIGH_WATER]
      @results[:HIGH_WATER] = value if !high_water or value > high_water
      low_water = @results[:LOW_WATER]
      @results[:LOW_WATER] = value if !low_water or value < low_water
    end

    # Reset any state
    def reset
      @results[:HIGH_WATER] = nil
      @results[:LOW_WATER] = nil
    end

    # Convert to configuration file string
    def to_config
      "  PROCESSOR #{@name} #{self.class.name.to_s.class_name_to_filename} #{@item_name} #{@value_type}\n"
    end
  end
end
The initialize method gets passed the parameters from the config file. Thus our config file of:
PROCESSOR TEMP1WATER watermark_processor.rb TEMP1
passes ‘TEMP1’ into ‘item_name’ of the initialize method:
def initialize(item_name, value_type = :CONVERTED)
Since we only pass one value, we use the default value_type of :CONVERTED.
We store the item_name into a Ruby instance variable @item_name and call reset() to initialize our @results. But how did we get a @results instance variable? If you look at the class definition we are inheriting from Processor which is the base class for all COSMOS Processors. It declares a @results instance variable and initializes @results in its initialize method which we call using super(value_type).
The call method is the most important Processor method. It is always passed the packet and buffer. The packet is the COSMOS Packet instance which contains the value you’re interested in. Buffer is the raw binary buffer which this packet is based on. The Processor base class should never be directly used as it defines but does not implement call. Instead, you inherit from Processor like we did with WatermarkProcessor and implement your own call method. WatermarkProcessor reads the item we’re interested in and then compares it with the currently stored high and low value to determine if it should be saved. Note how it is saving the value in the @results hash with the :HIGH_WATER and :LOW_WATER symbol keys.
If you then open up the processor_conversion.rb code you can see how these results are converted into new telemetry items.
require 'cosmos/conversions/conversion'
module Cosmos
  # Retrieves the result from an item processor
  class ProcessorConversion < Conversion
    # @param processor_name [String] The name of the associated processor
    # @param result_name [String] The name of the associated result in the processor
    # @param converted_type [String or nil] The datatype of the result of the processor
    # @param converted_bit_size [Integer or nil] The bit size of the result of the processor
    def initialize(processor_name, result_name, converted_type = nil, converted_bit_size = nil)
      super()
      @processor_name = processor_name.to_s.upcase
      @result_name = result_name.to_s.upcase.intern
      if ConfigParser.handle_nil(converted_type)
        @converted_type = converted_type.to_s.upcase.intern
        raise ArgumentError, "Unknown converted type: #{converted_type}" if !BinaryAccessor::DATA_TYPES.include?(@converted_type)
      end
      @converted_bit_size = Integer(converted_bit_size) if ConfigParser.handle_nil(converted_bit_size)
    end

    # @param (see Conversion#call)
    # @return [Varies] The result of the associated processor
    def call(value, packet, buffer)
      packet.processors[@processor_name].results[@result_name] || 0 # Never return nil
    end
    def to_s; end # Not shown for brevity
    def to_config(read_or_write); end # Not shown for brevity
  end
end
First of all note that ProcessorConversion inherits from the Conversion base class. This is very similar to the WatermarkProcessor inheriting from the Processor base class. Again, there is an initialize method and a call method. The initialize method requires the processor_name and result_name and takes optional parameters that help describe the converted type. Let’s see how these map together in our definition.
Our config file looked like the following:
READ_CONVERSION processor_conversion.rb TEMP1WATER HIGH_WATER
This passes TEMP1WATER and HIGH_WATER as processor_name and result_name into initialize:
def initialize(processor_name, result_name, converted_type = nil, converted_bit_size = nil)
We store the processor name and result name into Ruby instance variables (first turning them into upper case strings). We additionally turn the result name into a Ruby symbol by calling intern on it. This allows us to match the symbol names we used in the WatermarkProcessor code.
All Conversion classes also implement the call method except with a slightly different signature. In addition to the packet and buffer being passed, the raw value is returned. The ProcessorConversion class uses the packet instance to access the processors hash by the given processor name and then accesses the results hash by the passed result name. We add a ‘|| 0’ which does a logical OR on the initial result to ensure that we don’t return a nil value as a result of the conversion.
So how could we implement our own Processor? Let’s say you had some telemetry points that you wanted to average and report that averaged value as a new telemetry item. This is useful because you can then add limits to this new item and act on its value in scripts without having to constantly perform the averaging operation.
First create your new Processor class. Let’s call it MeanProcessor. This code should go into a file called mean_processor.rb and can either live in one of your target/lib folders or since it’s generic we can put it in the top level /lib directory in our project.
require 'cosmos/processors/processor'
module Cosmos
  class MeanProcessor < Processor # @param item_name [Array<String>] The names of the items to mean
    def initialize(\*item_names) # the splat operator accepts a variable length argument list
      super(:CONVERTED) # Hard code to work on converted values
      @item_names = item_names # Array of the item names
      reset()
    end

    def call(packet, buffer)
      values = []
      @item_names.each do |item|
        values << packet.read(item, :CONVERTED, buffer)
      end
      @results[:MEAN] = values.inject(0, :+).to_f / values.length
    end

    # Reset any state
    def reset
      @results[:MEAN] = []
    end

    # Convert to configuration file string
    def to_config
      "  PROCESSOR #{@name} #{self.class.name.to_s.class_name_to_filename} #{@item_names.join(' ')}\n"
    end
  end
end
This class introduces some new Ruby syntax. Since we want to accept any number of items to average we have to accept a variable number of arguments in our initialize method. The ruby splat operator (or star operator) does this and places the arguments into a Ruby array. We store these names and then use them in our call method to perform the mean. I’m using a cool feature of Ruby’s Enumerable mixin, which is part of Array, to sum up the values (starting with 0) and then dividing by the number of values we have to get the mean. Note I’m also calling to_f to ensure the numerator is a floating point number so we do floating point math during the division. Integer division would truncate the value to an integer value.
First to use this new processor you need to require it in your target’s target.txt configuration file:
REQUIRE mean_processor.rb
Then delcare the processing in your configuration definition as follows:
TELEMETRY INST HEALTH_STATUS BIG_ENDIAN "Health and status from the instrument"
  ... # See demo configuration
  ITEM TEMPS_MEAN 0 0 DERIVED "Mean of TEMP1, TEMP2, TEMP3, TEMP4"
    READ_CONVERSION processor_conversion.rb TEMPMEAN MEAN
  PROCESSOR TEMPMEAN mean_processor.rb TEMP1 TEMP2 TEMP3 TEMP4
We define the processor on the INST HEALTH_STATUS packet and pass in 4 items to average. We also define a new derived item called TEMPS_MEAN which uses our previously described processor_conversion to pull out the MEAN value that we calculated. The result is shown in this PacketViewer screen shot:
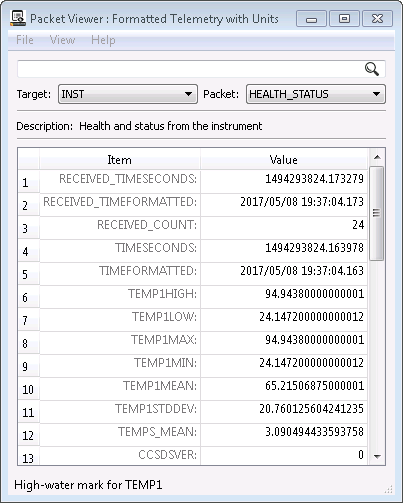
Creating a custom processor definitely requires you to dive into the COSMOS API and play with the underlying Ruby code. Hopefully the existing processor code and this blog post helps you to derive whatever telemetry points you need.
If you have a question which would benefit the community or find a possible bug please use our Github Issues.
Ball Aerospace COSMOS has been featured in an article on WIRED.com. The article focues on the fact that COSMOS is open source and what that means for the industry. The author includes quotes from GitHub’s VP of Product Engineering, Aerospace Corporation’s Principle Director of IT, and of course Ryan Melton and Jason Thomas of Ball Aerospace.
The Table Manager configuration file format has changed. Documentation will updated the first week of April.
You can migrate existing config files using:
bundle exec ruby tools\TableManager --convert config\tools\table_manager\old_table_def.txt
To upgrade to the latest version of COSMOS, run “bundle update cosmos” in your COSMOS project folder.
COSMOS Routers can be a confusing topic for people new and old alike to the COSMOS system. Let’s break them down and explore how COSMOS uses them internally and how you might use them in your configuration.
A COSMOS Router is first and foremost an interface like any other COSMOS interface. In fact if you look through the source code you won’t even see a Router class because they are instances of the Interface class. As a reminder, an Interface provides the lowest level connection between COSMOS and a target (something you’re trying to get COSMOS to talk to). Thus a Router is also providing a low level connection between COSMOS and something. So what’s the difference? Normal Interfaces read the target and send data (telemetry) to COSMOS and send commands to the target. Routers do the exact opposite: they route telemetry out to clients connected to them and route commands sent to them back to a target. Thus they provide a conduit for other clients to communicate with a target.
The COSMOS Command and Telemetry Server always starts a Router called the PREIDENTIFIED_ROUTER which appears in the Routers tab of the GUI:
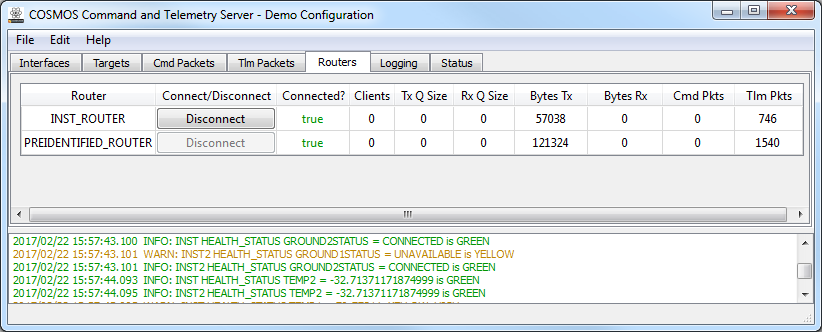
The Preidentified Router is controlled by the system.txt configuration file:
# Ethernet Ports
PORT CTS_API 7777
PORT TLMVIEWER_API 7778
PORT CTS_PREIDENTIFIED 7779
This Router is called the PREIDENTIFIED router because it uses a special stream protocol which adds the packet received time, the target name, and the packet name before sending the packet. This stream is used by the Telemetry Grapher so it doesn’t have to spend additional cycles identifying packets and can directly graph the packets it is interested in. The Replay tool also creates this router for the exact same purpose.
If you look back at the picture you’ll see in our demo configuration that we also create another Router called the INST_ROUTER. This is how that Router is configured:
ROUTER INST_ROUTER tcpip_server_interface.rb 2055 2055 10.0 nil LENGTH 32 16 7
  OPTION LISTEN_ADDRESS 127.0.0.1
  ROUTE INST_INT
Basically we’re creating a Router that routes only the INST interface data. We create this Router using a TCPIP Server interface with a LENGTH protocol of bit offset 32, length field size of 16, and length value offset of 7. These values were chosen to match the INST command and telemetry which use CCSDS headers. The CCSDS standard specifies a 16 bit length field at offset 32. The CCSDS standard also specifies that the length field is the length of the packet past the length field minus 1. Thus we add 7 for the 4 bytes of offset, 2 bytes of length field, and the minus 1.
For more information about the options you can pass to a Router (and Interface) see the Interface Configuration part of the documentation.
To connect to the INST_ROUTER that we created we can write a little Ruby code using existing COSMOS interface classes and streams.
require 'cosmos'
require 'cosmos/interfaces/tcpip_client_interface'

i = Cosmos::TcpipClientInterface.new('localhost',2055,2055,nil,nil,'LENGTH',32,16,7)
i.connect
loop do
  pkt = Cosmos::System.telemetry.identify!(i.read.buffer, ['INST'])
  puts pkt.packet_name
end
Obviously we need the TCPIP Client Interface to match the port number of the TCPIP Server and we also need to match the LENGTH protocol options. Notice how we have to call the System.telemetry.identify! method to identify the raw packet stream. When I run this from a command prompt after starting the Server I see a stream of packet names similar to this:
MECH
ADCS
MECH
IMAGE
PARAMS
ADCS
HEALTH_STATUS
MECH
ADCS
...
You should see MECH and ADCS come out at 10Hz and the IMAGE, PARAMS, and HEALTH_STATUS come out at 1Hz. This matches the Packet Count ratio on the Tlm Packets tab of the Server.
We can also write some code to connect to the PREIDENTIFIED router. It looks very similar to the previous code except we do not need to identify the packets as they are pre-identified!
require 'cosmos'
require 'cosmos/interfaces/tcpip_client_interface'

i = Cosmos::TcpipClientInterface.new('localhost',7779,7779,nil,nil,'PREIDENTIFIED')
i.connect
loop do
  pkt = i.read
  puts pkt.packet_name
end
This time you should see some LIMITS_CHANGE packet names sprinkled in with the output from before. That’s because we’re accessing the ENTIRE COSMOS telemetry stream and not just the stream from the INST interface. Keep this in mind if you have performance issues when trying to process the entire telemetry stream.
If you have a question which would benefit the community or find a possible bug please use our Github Issues.
None
To upgrade to the latest version of COSMOS, run “bundle update cosmos” in your COSMOS project folder.
The fact that COSMOS is the only open source C2 system has made it an ideal small satellite operations platform. This is one of the reasons Ryan attended the Small Satellite Conference back in August. He gave a very well received COSMOS presentation and was able to meet with many players in the industry.
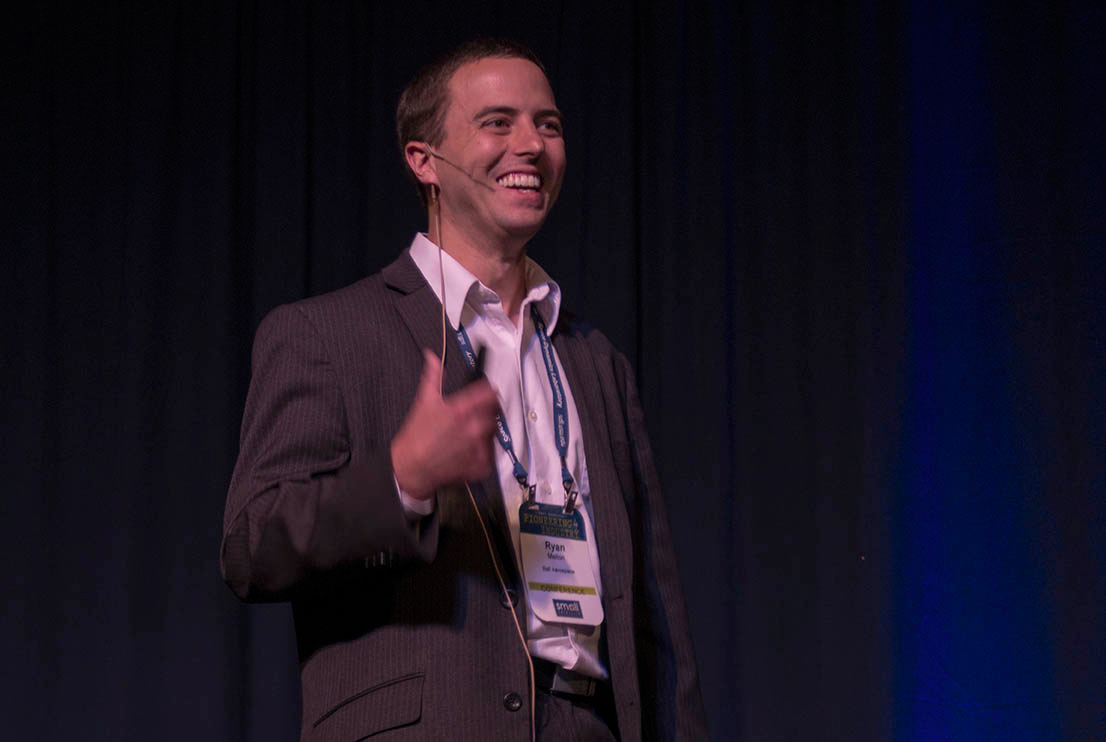 Ryan enjoying the moment at Small Sat 2016
I recently googled for “COSMOS Command and Control” and came across a LinkedIn article about COSMOS. We had heard from Pat Stakem during the summer of 2015 but hadn’t heard much since. He and his students created a CubeSat using the open source Core Flight System from NASA Goddard. Of course they used COSMOS for their ground system running on Ubuntu. They integrated Apache to serve up the COSMOS telemetry files generated from Telemetry Extractor to operate their satellite “lights out”. They put together a great PowerPoint presentation with screenshots of COSMOS. They also created a whitepaper detailing the entire process.
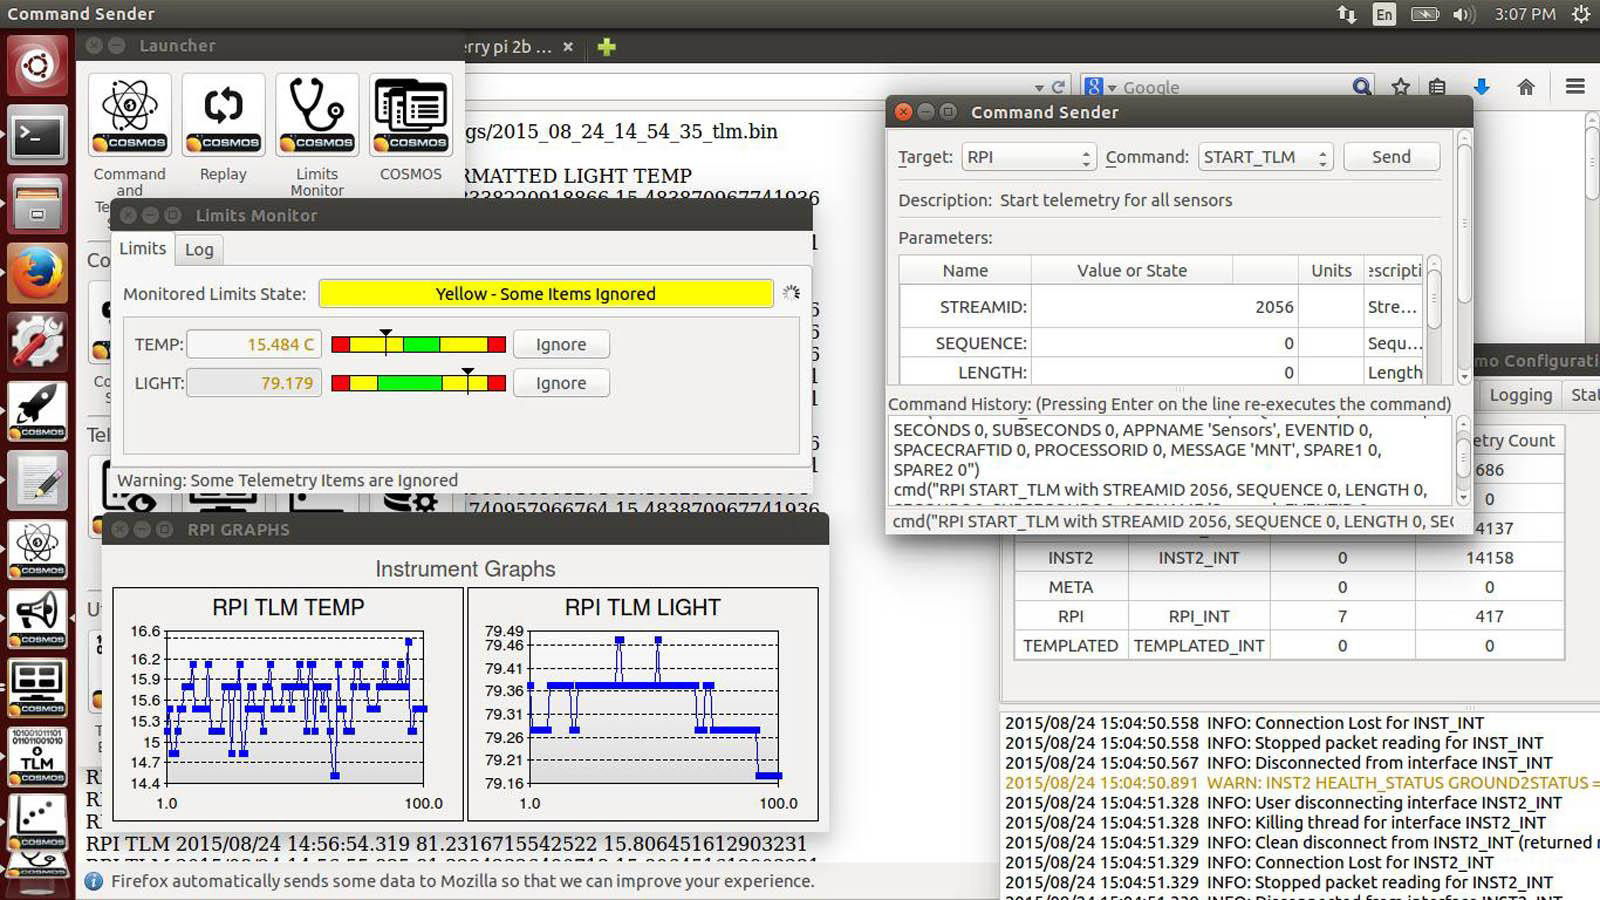 Screenshot showing COSMOS in action
COSMOS configuration files support ERB (Embedded RuBy) which is used heavily by Ruby on Rails. I found a pretty good description of ERB here. ERB allows you to put executable Ruby code in your configuration files. The trick is to surround the Ruby code with the special markers: <% <code> %>. If you want the result of your Ruby code to be placed in the configuration file you need to add the equal sign to the first marker: <%= <code> %>
A COSMOS user recently asked if he could include environment variables in his COSMOS configuration. This is very easy using the ERB syntax. For example, you have an environment variable named “LOG_DIR” in your system which points to the path you want to store your COSMOS logs. To use this value you would modify your system.txt file as follows:
...
# Paths
PATH LOGS <%= ENV["LOG_DIR"] %>
...
When this file gets parsed by COSMOS, the value of the LOG_DIR environment variable gets inserted into the system.txt output file. Note the %= syntax to insert the value and how I’m using the ENV from the Ruby core library.
It’s recommended that you don’t put too much logic in these ERB statements to keep your configuration files readable and maintainable. If you have a complex piece of code you want to use in an ERB statement, you can create a utility in your ‘lib’ folder and define methods to use. For example, in your ‘lib’ folder create utilties.rb:
def log_path
  File.join(Cosmos::USERPATH, 'outputs', 'mylogs')
end
Now in system.txt we can use that ‘log_path’ routine after we first require ‘utilities’.
<% require 'utilities' %>
...
# Paths
PATH LOGS <%= log_path() %>
...
Notice how the first ERB statement does NOT use the %= syntax since I’m simply requiring the file I want to use. I don’t want to put anything in the template itself. Later in the PATH statement I use the %= syntax to insert the result of the log_path() method.
ERB templates are particularly useful in command and telemetry definitions as they allow you to reuse sections. We’ve added our own routine called ‘render’ (similar to Ruby on Rails) which can render a command or telemetry template. The best example of this is in the COSMOS Demo INST target. If you open the inst_cmds.txt file you’ll see this:
COMMAND INST COLLECT BIG_ENDIAN "Starts a collect on the instrument"
  <%= render "_ccsds_cmd.txt", locals: {id: 1} %>
  PARAMETER    TYPE           64  16  UINT MIN MAX 0 "Collect type"
    REQUIRED
    STATE NORMAL  0
    STATE SPECIAL 1 HAZARDOUS
  PARAMETER    DURATION       80  32  FLOAT 0.0 10.0 1.0 "Collect duration"
  PARAMETER    OPCODE        112   8  UINT 0x0 0xFF 0xAB "Collect opcode"
    FORMAT_STRING "0x%0X"
  PARAMETER    TEMP          120  32  FLOAT 0.0 25.0 0.0 "Collect temperature"
    UNITS Celsius C

COMMAND INST ABORT BIG_ENDIAN "Aborts a collect on the instrument"
  <%= render "_ccsds_cmd.txt", locals: {id: 2} %>

...
Notice the call to <%= render "_ccsds_cmd.txt", locals: {id: 1} %>. Opening the ‘_ccsds_cmd.txt’ file reveals this command template:
  PARAMETER    CCSDSVER        0   3  UINT  0     0   0 "CCSDS primary header version number"
  PARAMETER    CCSDSTYPE       3   1  UINT  1     1   1 "CCSDS primary header packet type"
  PARAMETER    CCSDSSHF        4   1  UINT  0     0   0 "CCSDS primary header secondary header flag"
  ID_PARAMETER CCSDSAPID       5  11  UINT  0  2047 999 "CCSDS primary header application id"
  PARAMETER    CCSDSSEQFLAGS  16   2  UINT  3     3   3 "CCSDS primary header sequence flags"
  PARAMETER    CCSDSSEQCNT    18  14  UINT  0 16383   0 "CCSDS primary header sequence count"
    OVERFLOW TRUNCATE
  PARAMETER    CCSDSLENGTH    32  16  UINT MIN MAX 12 "CCSDS primary header packet length"
  ID_PARAMETER PKTID          48  16  UINT MIN MAX <%= id %> "Packet id"
The call to render replaces everything in the named template with the render call. We follow the Ruby on Rails convention of naming these templates (Rails calls them ‘partials’) with a leading underscore to differentiate them from full command and telemetry definitions. Notice too that we are passing local variables to the template. The ‘id: 1’ syntax is basically setting the ‘id’ variable in the template to 1. This allows us to send a different PKTID to each command.
ERB is incredibly powerful and a great way to avoid WET (Write Each Time) command and telemetry definitions. Now go DRY (Don’t Repeat Yourself) up your COSMOS configuration!
If you have a question which would benefit the community or find a possible bug please use our Github Issues.
Sometimes we receive requests to make custom COSMOS widgets or to modify existing COSMOS widgets to add certain looks or functionality. While this is a project we’re happy to perform for our customers, it’s also something that can be done by end users willing to dig into some of the Qt and COSMOS documentation. In this post, I’m going to describe how to create a custom COSMOS widget.
When asked to perform customizations like this I first bring up the COSMOS Demo. We try to include all the COSMOS features in the Demo so end users have concrete examples to follow instead of relying solely on the excellent documentation at cosmosc2.com. Obviously you must first have COSMOS installed so follow the installation instructions and then launch the Demo by running the Launcher in the Demo folder. Here is how the server appears on my Windows machine:

I’m going to create a custom widget in the INST target to display some of the Array data in a table. If you first launch the Telemetry Viewer and open the INST ARRAY screen you should see the following:

This screen is already using the Array widget to display this data in a text box. We will add our new widget to the top of the screen which will display the data in a table. Let’s add the line to the screen which will call our new widget. Edit demo/config/targets/INST/screens/array.txt and add the following line in the middle:
...
TITLE "Instrument Array Data"
DEMOTABLE INST HEALTH_STATUS ARY
ARRAY INST HEALTH_STATUS ARY 300 50 nil 8 FORMATTED
...
Now we need to create the DemotableWidget which will implement the actual display. Create a new file called demotable_widget.rb in demo/config/targets/INST/lib. Note that the name of the line in the config file, DEMOTABLE, must be all lowercase followed by an underscore and ‘widget’. The class name in the file must be one word with the first letter and Widget capitalized. This is how it should start:
require 'cosmos/tools/tlm_viewer/widgets/widget'

module Cosmos
  class DemotableWidget < Qt::TableWidget
  include Widget
    def initialize(parent_layout, target_name, packet_name, item_name, value_type = :WITH_UNITS)
      super(target_name, packet_name, item_name, value_type)
    end
  end
end
We’re extending the closest widget that Qt offers to what we’re trying to achieve. In this case it’s pretty obvious but you can get documentation on all the Qt classes. In many cases it might be easier to extend an existing COSMOS widget.
Note that our initialize method takes the parent_layout as the first value. All COSMOS widgets make the first parameter the parent_layout so they can be added. The next four paramaters are typically the target_name, packet_name, item_name and value_type. Additional parameters can follow the value_type parameter. The first thing we do in the initialize method is call super which calls the Widget initialize method. If you run this code you should see that the screen displays but doesn’t look any different. That’s because we haven’t actually added our new widget to the parent_layout. Before adding widgets to the layout you typically want to configure them. For our table, we need to set the number of rows and columns. First I grab the telemetry value from the server using the System.telemetry.value method defined in telemetry.rb. Since this is an array value I call length to determine how many rows to display in the table. I then use the Qt methods setRowCount and setColumnCount to initialize the table. You can find these methods in the Qt::TableWidget documentation. Finally I call the addWidget method which is a part of all the Qt::Layout classes.
def initialize(parent_layout, target_name, packet_name, item_name, value_type = :WITH_UNITS)
  super(target_name, packet_name, item_name, value_type)
  value = System.telemetry.value(target_name, packet_name, item_name) # Get the value
  @rows = value.length # Store the rows
  setRowCount(@rows)
  setColumnCount(1)
  parent_layout.addWidget(self) if parent_layout
end
Now if you stop and restart the Telemetry Viewer (so it can re-require the new widget code) it should display an empty table:

To actually populate it with data we must follow the Cosmos Widget conventions. First of all by including Widget you include all the Widget code which creates two key class methods: layout_manager? and takes_value?. These must be overridden to return true if your widget is either a layout or takes a value respectively. Since our widget will be taking the array data as a value we must override takes_value?:
require 'cosmos/tools/tlm_viewer/widgets/widget'

module Cosmos
  class DemotableWidget < Qt::TableWidget
  include Widget
    def self.takes_value?
      return true
    end
  end
end
Typically class methods are defined at the top of the source file and begin with self. You can also type out the class name but this is less robust as changing the class name requires changing the method name. Implementing this class method allows Telemetry Viewer to call the value=(data) method with new telemetry data. The value method implementation should look like this:
def value=(data)
  (0...@rows).each do |row| # Note the extra 'dot' which means up to but not including
    setItem(row, 0, Qt::TableWidgetItem.new(data[row].to_s))
  end
end
The data value passed to the method is the same target, packet, and item used in the screen definition. In our value= method we are using our stored instance variable @rows to index into the array data and create new Qt::TableWidgetItem instances to store the data. TableWidgetItems expect Strings to be passed so I call to_s on the data item to ensure it is a String. If you now re-launch Telemetry Viewer you should see the values populated in the table:

At this point you could be done. But wait! The Array widget below the table fades darker to implement “aging”, showing the user the values haven’t changed. How do we implement “aging” in our new widget? To start we require the aging_widget and include the AgingWidget module. Then we must call the setup_aging method in our initialize method as well as redefine the process_settings method:
require 'cosmos/tools/tlm_viewer/widgets/widget'
require 'cosmos/tools/tlm_viewer/widgets/aging_widget'

module Cosmos
  class DemotableWidget < Qt::TableWidget
    include Widget
    include AgingWidget

    def initialize(parent_layout, target_name, packet_name, item_name, value_type = :WITH_UNITS)
      super(target_name, packet_name, item_name, value_type)
      setup_aging()
      value = System.telemetry.value(target_name, packet_name, item_name) # Get the value
      @rows = value.length # Store the rows
      setRowCount(@rows)
      setColumnCount(1)
      parent_layout.addWidget(self) if parent_layout
    end

    def process_settings
      super
      process_aging_settings
    end
  end
end
Note that we were able to remove the class method self.takes_value? because AgingWidget already implements it. This is all required to setup aging but we must still modify the value= method to do the work. First in value= we call super to call the AgingWidget’s value= method. This method returns a string representation of the data with the correct foreground color and text character indicating the color, e.g. G=Green, Y=Yellow, R=Red. This is important for values with limits settings but since our array value doesn’t have limits I’m going to igore the return value and simply allow the aging routine to age the data. Interally this updates the @background instance variable with the current ‘aged’ background color. I then set the TableWidgetItem’s background color to this color before adding it to the table:
def value=(data)
  super(data)
  (0...@rows).each do |row|
    item = Qt::TableWidgetItem.new(data[row])
    item.setBackgroundColor(@background)
    setItem(row, 0, item)
  end
end
The end result is aging:

Note that if you have a widget that implements aging and limits you’ll want to keep the value returned by super and use it in your widget. If you don’t want the aging routine to directly use your data value you can pass a string as the second parameter, e.g. super(data, text). This text string will be modified with the color blind settings. Basically that means that whatever the calculated @foreground color string is, a corresponding text character is added (R=Red, G=Green, etc) to aid people who can’t distinguish colors. See aging_widget.rb for more details.
If you have a question which would benefit the community or find a possible bug please use our Github Issues.
This article only applies to pre-4.0.0 COSMOS releases. For current COSMOS releases please see the new Interface and Protocol documentation.
One of our Ball Aerospace engineers asked how they could add a checksum to an existing COSMOS interface when talking to their target. COSMOS does not support this directly so it requires creating a custom interface. While this might sound daunting, the COSMOS interfaces were designed just for this type of extension and provide hooks for customization.
In this example we will assume the original interface is the COSMOS Serial Interface. In your target’s lib folder create a new interface called checksum_serial_interface.rb:
require 'cosmos' # always require cosmos
require 'cosmos/interfaces/serial_interface' # original interface being extended

module Cosmos
  class ChecksumSerialInterface < SerialInterface
    def pre_write_packet(packet)
      data = packet.buffer
      checksum = 0xFFFF
      data.each_byte {|x| checksum += x }
      checksum &= 0xFFFF
      data << [checksum].pack("n") # Pack as 16 bit unsigned bit endian
      return data
    end

    def post_read_data(packet_data)
      len = packet_data.length
      calc_checksum = 0xFFFF
      packet_data[0..(len - 3)].each_byte {|x| calc_checksum += x }
      calc_checksum &= 0xFFFF
      rx_checksum = packet_data[-2..-1].unpack("n") # Unpack as 16 bit unsigned big endian
      if calc_checksum == rx_checksum
        return packet_data
      else
        puts "Bad checksum detected. Calculated: 0x#{calc_checksum.to_s(16)} Received: 0x#{rx_checksum.to_s(16)}. Dropping packet."
        return "" # Also can return nil to break the connection and reconnect to the target
      end
    end
  end
end
What we’re doing is overriding pre_write_packet in StreamInterface to allow us to modify the data before it is written to the packet and sent over the interface. We also override post_read_data to operate on data received before it is sent back to the COSMOS server and thus the tools. Note there is also a post_read_packet(packet) method which is called after post_read_data is called and after the COSMOS Packet has been created. All Interfaces inheriting from StreamInterface includes these callback methods, including SerialInterface, TcpipServerInterface, and TcpipClientInterface. Note that UdpInterface inherits directly from Interface and thus does NOT include these callbacks.
Then in your cmd_tlm_server.txt file for your target you use your new interface:
#         interface name  file name                    write read baud   parity stop timeouts stream
INTERFACE UART_INTERFACE  checksum_serial_interface.rb COM1  COM1 115200 NONE   1    nil nil  BURST
I added a comment line above the definition which describes the settings. For more information see the Serial Interface documentation.
This same technique can obviously be used to extend the the other TCPIP interfaces and can be used with all the various Streams COSMOS defines.
If you have a question which would benefit the community or find a possible bug please use our Github Issues.
Recently a user asked if they could add exclamation points and question marks to their command and telemetry items. Absolutely! COSMOS provides great flexibility in command and telemetry naming conventions. (See Command). For example, adding an exclamation point to a command to denote a more severe version of the same command:
COMMAND TGT ABORT BIG_ENDIAN "Tries to abort a collect on the instrument"
COMMAND TGT ABORT! BIG_ENDIAN "Force aborts a collect on the instrument"
While it doesn’t make sense to define a command with a question mark, it works well with telemetry points. For example, there is a telemetry point which indicates whether a mechanism is deployed or not. It is an analog value that indicates deployed if the value is above zero. To view both the raw value and the deployed status, define a derived telemetry point which indicates a TRUE or FALSE status:
APPEND_ITEM DEPLOYED 16 UINT "Deployed raw value"
ITEM DEPLOYED? 0 0 DERIVED "Deployed status"
  STATE FALSE 0
  STATE TRUE 1
  GENERIC_READ_CONVERSION_START UINT 8
    myself.read('DEPLOYED') > 0 ? 1 : 0
  GENERIC_READ_CONVERSION_END
Note that this is probably overkill in this case because the conversion could just as easily be applied directly to the item. The raw value could then be obtained by calling tlm_raw(“TGT PKT DEPLOYED”) (see tlm_raw).
These practices are similar to the Ruby convention of using methods with an exclamation point (bang) to indicate a dangerous method which typically directly modifies its caller. Ruby also has a convention of methods with question marks returning a boolean true or false value. Read more in the Ruby documentation.
None
Ball Aerospace COSMOS has been featured in a blog post on SparkFun. SparkFun is an online retail store that sells electronics primarily for hobbyists. Ball recently purchased a Raspberry Pi, Arduino, and various other parts to interface to COSMOS. We think hobbyists will find COSMOS a great way to interface to their embedded projects and SparkFun agrees! Get started with COSMOS now!
A Ball engineer wrote a Wiki on how he configured COSMOS to talk to his Arduino Uno. It’s a little old but it gives a nice step by step tutorial on how to use COSMOS with an Arduino.
Ball Aerospace COSMOS now has support for the XTCE Command and Telemetry Definition Standard. This is an open standard designed to allow command and telemetry definitions to be transferred between different ground systems. COSMOS can run directly using the .xtce files, or can convert them into the COSMOS configuration file format.
See the docs for more information: XTCE Support
Ball Aerospace COSMOS has been honored by the Ruby community by receiving one of the three Fukuoka Special Awards handed out this year! This is a great honor with the contest judging being led by Matz himself (the creator of the Ruby programming language).
With this release COSMOS now has initial support for the XTCE Command and Telemetry Definition standard.
None
Sometimes you have a need to create a simulated target in COSMOS. This simulated target is not a physical target producing data and accepting commands but a software target which generates data and sends it to COSMOS. This is exactly how the COSMOS Demo operates within the INST target that it creates. While this is a very full featured example its complexity can be a little overwhelming. In this post I’m going to break down a much simpler simulated target so you can create your own.
First of all create a new COSMOS target directory in config/targets. I called mine INST (instrument) to match the COSMOS demo. Create the ‘cmd_tlm’ and ‘lib’ subdirectories. For my demo I created a simple ‘cmd.txt’ file which contains a single command:
COMMAND INST SET_STATUS BIG_ENDIAN "Set status"
  APPEND_PARAMETER STATUS 0 STRING "STATUS" "Status"
    STATE "OK" "OK"
    STATE "ERROR" "ERROR"
I created a ‘tlm.txt’ file which contains two different telemetry packets:
TELEMETRY INST STATUS BIG_ENDIAN "Status from the instrument"
  APPEND_ID_ITEM ID 16 UINT 1 "Packet ID"
  APPEND_ITEM COUNTER 16 UINT "Packet counter"
  APPEND_ITEM STATUS 0 STRING "Most recent ASCIICMD string"
    STATE "OK" "OK"
    STATE "ERROR" "ERROR"

TELEMETRY INST DATA BIG_ENDIAN "Data from the instrument"
  APPEND_ID_ITEM ID 16 UINT 2 "Packet ID"
  APPEND_ITEM COUNTER 16 UINT "Packet counter"
  APPEND_ITEM TIMESEC 32 UINT "Seconds since epoch (January 1st, 1970, midnight)"
  APPEND_ITEM TIMEUS  32 UINT "Microseconds of second"
  APPEND_ITEM TEMP1 32 INT "Temperature #1"
    UNITS CELSIUS C
    FORMAT_STRING "%0.3f"
    LIMITS DEFAULT 1 ENABLED -80.0 -70.0 60.0 80.0 -20.0 20.0
The cmd_tlm_server.txt file is very simple:
INTERFACE INST_INT simulated_target_interface.rb sim_inst.rb
  TARGET INST
The real work is in implementing how your simulated target is going to behave. This is done in the lib/sim_inst.rb file. Note that whatever you name your simulated target file must match the last parameter of the INTERFACE in the cmd_tlm_server.rb as shown above.
I’ll break down my sim_inst.rb piece by piece and then list it in its entirety. First you must inherit from the Cosmos::SimulatedTarget.
require 'cosmos'
module Cosmos
  class SimInst < SimulatedTarget
Next you can initialize any of your packets in the initialize method. This is entirely optional but I show how to use the @tlm_packets hash to access all the defined packets. This hash is created automatically by the SimulatedTarget based on all the packets you have defined in your cmd_tlm/tlm.txt file. Note that there is NOT a corresponding @cmd_packets.
def initialize(target_name)
  super(target_name)

  # We grab the STATUS packet to set initial values
  packet = @tlm_packets['STATUS']
  packet.enable_method_missing # required to use packet.<item> = value
  packet.status = "NONE"
end
We then have to configure the telemetry packet rates of our target. That is, how fast do the packets get sent out. This is handled by implementing the set_rates method and by calling set_rate for each packet defined in your system. If you do not call set_rate the packet will not be send out periodically (which may be desirable for event based packets).
def set_rates
  # The SimulatedTarget operates on a 101Hz clock
  # Thus the rates are determined by dividing this rate
  # by the set rate to get the output rate of the packet
  set_rate('STATUS', 100) # 100 / 100 = 1Hz
  set_rate('DATA', 10) # 100 / 10 = 10Hz
end
If your target will accept command you need to implemented the write(packet) method. My write method is simple in that I only have a single command that directly sets a value in one of my telemetry packets.
def write(packet)
  # We directly set the telemetry value from the only command
  # If you have more than one command you'll need to switch
  # on the packet.packet_name to determine what command it is
  @tlm_packets['STATUS'].status = packet.read("status")
end
Your target must implement the read(count_100hz, time) method to return telemetry packets back to COSMOS. You’ll call the get_pending_packets(count_100hz) method implemented by SimulatedTarget and then perform whatever operations you want on the packets before returning the array of packets back to COSMOS. Note my use of the cycle_tlm_item method to automatically cycle the telemetry item as each packet is sent out. This is used heavily in the COSMOS Demo.
def read(count_100hz, time)
  # The SimulatedTarget implements get_pending_packets to return
  # packets at the correct time interval based on their rates
  pending_packets = get_pending_packets(count_100hz)

  pending_packets.each do |packet|
    case packet.packet_name
    when 'STATUS'
      packet.counter += 1
    when 'DATA'
      # This method in SimulatedTarget cycles the specified telemetry
      # point between the two given values by the given increment for
      # each packet sent out.
      cycle_tlm_item(packet, 'temp1', -95.0, 95.0, 1.0)

      packet.timesec = time.tv_sec
      packet.timeus  = time.tv_usec
      packet.counter += 1
    end
  end
  pending_packets
end
Hopefully that a little easier to understand than the full COSMOS Demo which has much more complex command and telemetry definitions and simulated targets in order to better exercise the various COSMOS tools. While there are other ways to simulate COSMOS targets they can get you into trouble if you’re not careful about properly cloning packets sending back updated data. Additionally, using the SimulatedTargetInterface in your Interface makes it very clear to other developers that this target is indeed simulated.
Without further ado, here is my sim_inst.rb in its entirety:
require 'cosmos'
module Cosmos
  class SimInst < SimulatedTarget
    def initialize(target_name)
      super(target_name)

      # We grab the STATUS packet to set initial values
      packet = @tlm_packets['STATUS']
      packet.enable_method_missing # required to use packet.<item> = value
      packet.status = "NONE"
    end

    def set_rates
      # The SimulatedTarget operates on a 100Hz clock
      # Thus the rates are determined by dividing this rate
      # by the set rate to get the output rate of the packet
      set_rate('STATUS', 100) # 100 / 100 = 1Hz
      set_rate('DATA', 10) # 100 / 10 = 10Hz
    end

    def write(packet)
      # We directly set the telemetry value from the only command
      # If you have more than one command you'll need to switch
      # on the packet.packet_name to determine what command it is
      @tlm_packets['STATUS'].status = packet.read("status")
    end

    def read(count_100hz, time)
      # The SimulatedTarget implements get_pending_packets to return
      # packets at the correct time interval based on their rates
      pending_packets = get_pending_packets(count_100hz)

      pending_packets.each do |packet|
        case packet.packet_name
        when 'STATUS'
          packet.counter += 1
        when 'DATA'
          # This method in SimulatedTarget cycles the specified telemetry
          # point between the two given values by the given increment for
          # each packet sent out.
          cycle_tlm_item(packet, 'temp1', -95.0, 95.0, 1.0)

          packet.timesec = time.tv_sec
          packet.timeus  = time.tv_usec
          packet.counter += 1
        end
      end
      pending_packets
    end
  end
end
Happy simulated target programming!
If you have a question which would benefit the community or find a possible bug please use our Github Issues.
None
Ball Aerospace COSMOS is being featured in three papers and presentations at this years Aerospace Testing Seminar (ATS) taking place at the Renaissance Los Angeles Airport Hotel October 27-29, 2015.
The three papers presented are here:
Huge new feature in this release: All COSMOS configuration files are now interpreted with the ERB preprocessor! This allows you to use Ruby code within the configuration files to help build them. You can also render partials of common information such as packet headers so you only have to define them once. See the INST target in the updated Demo project for examples.
None
The launcher scripts and .bat files that live in the COSMOS project tools folder have been updated to be easier to maintain and to ensure that the user always sees some sort of error message if a problem occurs starting a tool. All users should copy the new files from the tools folder in the COSMOS demo folder into their projects as part of the upgrade to COSMOS 3.5.1
COSMOS now disables reverse DNS lookups by default because they can take a long time in some environments. If you still want to see hostnames when someone connects to a TCP/IP server interface/router then you will need to add ENABLE_DNS to your system.txt file.
This release fixes a bug and completes the installation scripts for linux/mac.
The launcher scripts and .bat files that live in the COSMOS project tools folder have been updated to be easier to maintain and to ensure that the user always sees some sort of error message if a problem occurs starting a tool. All users should copy the new files from the tools folder in the COSMOS demo folder into their projects as part of the upgrade to COSMOS 3.5.1
COSMOS now disables reverse DNS lookups by default because they can take a long time in some environments. If you still want to see hostnames when someone connects to a TCP/IP server interface/router then you will need to add ENABLE_DNS to your system.txt file.
This release contains a lot of new functionality and a key new feature: The ability to create new COSMOS targets and tools as reusable gems! This will hopefully allow the open source community to create sharable configuration for a large amount of hardware and allow for community generated tools to be easily integrated.
The launcher scripts and .bat files that live in the COSMOS project tools folder have been updated to be easier to maintain and to ensure that the user always sees some sort of error message if a problem occurs starting a tool. All users should copy the new files from the tools folder in the COSMOS demo folder into their projects as part of the upgrade to COSMOS 3.5.0
COSMOS now disables reverse DNS lookups by default because they can take a long time in some environments. If you still want to see hostnames when someone connects to a TCP/IP server interface/router then you will need to add ENABLE_DNS to your system.txt file.
COSMOS 3.4.2 requires qtbindings 4.8.6.2. You must also update qtbindings when installing this release. Also note that earlier versions of COSMOS will not work with qtbindings 4.8.6.2. All users are strongly recommended to update both gems.
None
Note: COSMOS 3.4.0 has a serious regression when writing to variably sized packets. Please upgrade to 3.4.1 immediately if you are using 3.4.0.
None
The COSMOS framework has several C extensions created to increase performance. One critical piece that was created early on is the extension to the BinaryAccessor class. This allows for increased performance when reading items from binary packets which is the most common operation in the COSMOS system. I created a COSMOS performance configuration which spawns 30 fake targets and attempts to send commands to them as fast as possible. Sending commands exercies the write portion of BinaryAccessor and profiling showed this was now becoming a bottleneck. Therefore I set out to port the write method to the existing C extension.
The fact that Ryan had already implemented the read method as a C extension gave me a huge head start. I first copied all the Ruby code directly into the C extension so I could try to translate it line by line. Initially if I didn’t know how to do the translation I would just comment it out and see how much I could compile. A nice way to do this in C code is use #if 0 ... #endif. I also copied the read method signature and locals since the methods are similar. Before I get to far into the guts I should note that this effort relied on a very comprehensive spec or I would have had no idea if I was successful.
Once I implemented the initial parameter checking I dove into the String and Block (binary string) handling portion of the write method. The write method modifies the given buffer by writing a String or Block into it. I started with Google and found Chris Lalancette’s post and this excellent write-up on The Ruby C API. I also cloned ruby itself and went directly to the code. I found the code a little difficult to follow but the important thing to remember is if the method is NOT delcared static then you can use it in your C extension. I ended up using rb_str_concat to add to the buffer and rb_str_update to directly modify the buffer.
If you directly modify the Ruby string buffer in a C extension with memcpy, memmove, or memset (after getting a pointer with RSTRING_PTR), you need to tell the Ruby runtime with the rb_str_modify method. Calling Ruby's methods like rb_str_update automatically handles this for you.
Another issue I ran into was the existing Ruby code was calling to_s on the input value to ensure it was a String. In the C extension you can check for a type using RB_TYPE_P(value, T_STRING) where value is a unknown Ruby VALUE instance and T_STRING can be any number of Ruby types. If the value was not a Ruby String I used rb_funcall to directly call the Ruby runtime and call the to_s method. If you are unable to find an appropriate method in the C library to do what you want, this is the way to use Ruby from within your C extension.
Next I started to tackle the writing of signed and unsigned integers. COSMOS supports overflow of integers by either truncating a passed in value, saturating to the high or low, or raising an error. So I implemented a check_overflow method in C to handle this logic. This code was very difficult to get right because of the size of the values involved. Since COSMOS handles integers of any size, I had to create Ruby Bignum constants to perform the comparisons. This involved another dive into the Ruby source to understand bignum.c. One of the tricks was to create Ruby Constants up front in the Initialization routine so I wasn’t constantly recalulating Bignums for comparison. COSMOS also handles bitfields so those values I generate dynamically using rb_big_pow and rb_bit_minus. I also created a TO_BIGNUM macro which converts Fixnum to Bignum so all the math uses Bignum methods. I could then use the rb_big_cmp to compare the given value with the appropriate minimum and maximum values.
The bitfield logic was the most complex to convert to C. This required a lot of C printfs and Ruby puts at each step of the way to ensure all the intermediary calculations were matching up. COSMOS supports big and little endian data buffers so I had to ensure the bytes were reversed and shifted as necessary before finally writing them back to the buffer. Again the rb_str_modify function is called to notify the Ruby runtime that the buffer has been changed.
The floating point values were probably the easiest because I simply called RFLOAT_VALUE(value) to get the double value of the passed in Ruby value. At this point I was able to successfully run the full spec. However, once I ran the entire COSMOS spec suite I hit a failure on a simple write call in api_spec.rb. I determined the spec was trying to send an integer value where there was a floating point value defined. The old Ruby code simply converted this value inline but I was calling RFLOAT_VALUE(value) which ASSUMES the value is a float. I updated the binary_accessor_spec.rb to capture this failure and also noted a similar issue in the integer logic. The Ruby code was calling value = Integer(value) for integers and value = Float(value) for floats. This not only handles the case of passing an integer value when you want to write a float, it also handles truncating a float to an integer and even handles parsing a String which contains a numeric value. When you have a tremendous amount of work being done by Ruby you are best to fall back to rb_funcall. But how to call the Integer() method which doesn’t appear to have a receiver. Remember that if a method doesn’t appear to have a receiver it’s probably being called on Kernel which is exactly the case. Thus I call it with value = rb_funcall(rb_mKernel, rb_intern("Float"), 1, value);. (Note: I also discovered I could call the method passing ‘self’ instead of rb_mKernel but using Kernel felt more explicit).
At this point I refactored to combine some of the functionality in the read method with the new write method. I probably could have done more refactoring but refactoring C code just isn’t as much fun as refactoring Ruby code. Once I completed the refactor I wanted to benchmark my new C extension to determine how much faster (or slower?) I made it. I love the benchmark-ips gem as it benchmarks iterations per second and automatically determines how many times to run the code to get good data. But I didn’t want to re-write our existing specs to support using this gem so I looked into how to integrate it with RSpec. It turns out this is all that was needed in our spec_helper.rb:
if ENV.key?("BENCHMARK")
  c.around(:each) do |example|
    Benchmark.ips do |x|
      x.report(example.metadata[:full_description]) do
        example.run
      end
    end
  end
end
Benchmark-ips works by calculating the number of runs to get interesting data and then running the code in question. Thus defining BENCHMARK in the environment makes the specs run EXTREMELY slow. I used the ability of RSpec to filter only the examples I wanted to benchmark with the -e option:
rspec spec/packets/binary_accesor_spec.rb -e "write only"
Running this in master and then in my C-extension branch I calculated the difference in iterations and then filtered out all the “complains” (raise an exception) and “overflow” test cases to focus on just the tests which write values. The average improvement was 1.3x. Not quite as awesome as I was hoping for but an improvement in an area that is performance sensitive. I suspected I could get additional performance if I optimized the check_overflow method to not always use Bignums and to do Fixnum comparisons if possible. However, this did not yield any optimizations so I backed out the change.
At this point I submitted the pull request which broke the Travis build. Ryan then added a patch that corrected all my issues and the build passed. I re-benchmarked his changes and overall the results were actually slightly faster on average so the pull request was merged.
Enjoy a faster COSMOS write routine!
System.telemetry.target_names and System.commands.target_names no longer contain the ‘UNKNOWN’ target.
COSMOS first-time startup speed is now 16 times faster - hence this release is codenamed “Startup Cheetah”. Enjoy!
System.telemetry.target_names and System.commands.target_names no longer contain the ‘UNKNOWN’ target.
Ball Aerospace COSMOS is participating in the poster session of this years Ground System Architectures Workshop (GSAW) taking place at the Renaissance Los Angeles Airport Hotel March 2-5, 2015.
If you’re attending the conference, stop by our poster in the exhibit hall and say hi!
No significant updates to existing code should be needed. The primary reason for update to 3.2.x is fixing the slow shutdown present in all of 3.1.x.
No significant updates to existing code should be needed. The primary reason for update to 3.2.x is fixing the slow shutdown present in all of 3.1.x.
The definition of limits persistence has changed. Before it only applied when changing to a bad state (yellow or red). Now persistence applies for all changes including from stale to a valid state and from bad states back to green.
The definition of limits persistence has changed. Before it only applied when changing to a bad state (yellow or red). Now persistence applies for all changes including from stale to a valid state and from bad states back to green.
Ball Aerospace COSMOS brings an exciting set of functionality to Operations and Integration & Test that had previously only been available in proprietary and expensive COTS solutions or not available in any commercial product. A full set of 15 applications provide features including automated test procedures, realtime and offline telemetry display and graphing, post-test analysis and CSV extraction, limits monitoring, command and telemetry handbook creation, and binary file editing.
Automated test procedures written for COSMOS offer the full power of the Ruby programming language allowing operators to send commands, verify telemetry, read and write files, access the network, and even send an email on completion. Additional features include automated test report generation, standardized meta data collection (unit serial number, operator name), and loop testing (executing the same test repeatedly to wring out timing and other issues). Advanced debugging functionality allows for single-stepping through procedures, setting breakpoints, and complete logging of all script and user interaction with the system under test.
Detailed data visualization allows for custom screen creation, line and x-y plotting of realtime data, easy creation of custom 3d visualizations, and the ability to quickly view any data provided by an embedded system. Post-test analysis and data extraction capabilities make narrowing down anomalies easy and allow for data to be quickly imported into outside data analysis systems such as Matlab.
“Ball Aerospace’s COSMOS enables an amazing amount of functionality and can provide a standard interface for interacting with anything that contains embedded software”, said Ryan Melton, COSMOS’s creator and open source evangelist. “By open sourcing this software we hope to change the whole playing field of Operations, Integration, and Test”.