
COSMOS and NASA cFS
Working configuration
This tutorial has been tested using the following components:
- COSMOS v5 release 5.0.4
- cFS master-branch commit: 561b128 (June 1, 2022)
- Docker Desktop 4.9.0 on Windows
Replace all <xxxxxx> with your matching paths and names. Example: <USERNAME>.
Setting up COSMOS
Install COSMOS according to the official installation instructions.
Configuring COSMOS
Change the Docker configuration for the interoperability with NASA cFS. For
subscribing to the telemetry, you have to append a port binding in the file
compose.yaml under the section cosmos-operator. The port number has to
match with the port number cFS is sending the telemetry on.
cosmos-operator:
  ports:
    - "1235:1235/udp"
Run COSMOS, the first run takes a while (~15 min).
cosmos-control.sh start
When started, connect with a browser to http://localhost:2900.
For shutting down COSMOS:
cosmos-control.sh stop
Setting up cFS
To run NASA cFS as a Docker container do the following:
Clone cFS
git clone --recurse-submodules https://github.com/nasa/cFS.git
Create Dockerfile in cFS dir
FROM ubuntu:22.10 AS builder

ARG DEBIAN_FRONTEND=noninteractive
ARG SIMULATION=native
ENV SIMULATION=${SIMULATION}
ARG BUILDTYPE=debug
ENV BUILDTYPE=${BUILDTYPE}
ARG OMIT_DEPRECATED=true
ENV OMIT_DEPRECATED=${OMIT_DEPRECATED}

RUN \
  apt-get update && \
  apt-get -y upgrade && \
  apt-get install -y build-essential git cmake && \
  rm -rf /var/lib/apt/lists/*

WORKDIR /cFS
COPY . .

RUN git submodule init \
  && git submodule update \
  && cp cfe/cmake/Makefile.sample Makefile \
  && cp -r cfe/cmake/sample_defs .

RUN make prep
RUN make
RUN make install

FROM ubuntu:22.10
COPY --from=builder /cFS/build /cFS/build
WORKDIR /cFS/build/exe/cpu1
ENTRYPOINT [ "./core-cpu1" ]
Build and run cFS
Note we’re connecting to the COSMOS network (docker network ls) and exposing the cFS ports.
docker build -t cfs .
docker run --cap-add CAP_SYS_RESOURCE --net=cosmos_default --name cfs -p1234:1234 -p1235:1235 cfs
Creating a COSMOS plugin for TM/TC interface with cFS
The detailed instructions how to create a plugin, can be found here, in the chapter “Interfacing with Your Hardware”.
Create a new plugin with the name CFS. CFS is the name of the plugin and
must be in capital letters according to the COSMOS documentation. This command
should create the plugin structure.
# cd .. to the location of the cfs dir
$PATH_TO_COSMOS/cosmos-control.sh cosmos generate plugin CFS
If you’re on Linux, change the rights of this newly created plugin, because the COSMOS script creates the plugin to be owned by the root user.
sudo chown -R <USERNAME>:<USERGROUP> cosmos-cfs
In this newly created plugin, change the plugin.txt file, so that the
communication happens over UDP. port_tm is the port number on which cFS
sends the telemetry messages. port_tc indicates the port on which cFS listens to the
telecommands.
VARIABLE ip 127.0.0.1
VARIABLE port_tm 1235
VARIABLE port_tc 1234
VARIABLE cfs_target_name CFS

TARGET CFS <%= cfs_target_name %>
# hostname   write_dest_port   read_port   write_src_port   interface_address   ttl   write_timeout   read_timeout   bind_address
INTERFACE <%= cfs_target_name %>_INT udp_interface.rb <%= ip %> <%= port_tc %> <%= port_tm %> nil nil 128 nil nil
  MAP_TARGET <%= cfs_target_name %>
Note that the two arguments to the TARGET parameter are:
-
the physical target name that should match the name of the plugin, i.e.
CFS. This name must match the folder name in thetargetsfolder. Example: for theCFSplugin, the target specifications must be undercosmos-cfs/targets/CFS. If you don’t follow this convention, the server will refuse to install your plugin at the following steps. -
the name of your target and how it is shown in the user interface.
In this example, we keep both names to be CFS.
Creating TM/TC definitions
Change to the target folder and remove the existing files and create own files.
cd cosmos-cfs/targets/CFS/cmd_tlm
rm *
touch cfs_cmds.txt
touch cfs_tlm.txt
touch to_lab_cmds.txt
Open these newly created files in a text editor and fill them with following content.
to_lab_cmds.txt:
COMMAND CFS TO_LAB_ENABLE BIG_ENDIAN "Enable telemetry"
  #                   NAME      BITS TYPE   min VAL     max VAL    init VAL  DESCRIPTION
  APPEND_ID_PARAMETER STREAM_ID  16  UINT   0x1880      0x1880     0x1880    "Stream ID"
    FORMAT_STRING "0x%04X"
  APPEND_PARAMETER    SEQUENCE   16  UINT   0xC000      MAX_UINT16 0xC000    ""
    FORMAT_STRING "0x%04X"
  APPEND_PARAMETER    PKT_LEN    16  UINT   0x0001      0xFFFF     0x0012    "length of the packet"
  APPEND_PARAMETER    CMD_ID      8  UINT   6           6          6         ""
  APPEND_PARAMETER    CHECKSUM    8  UINT   MIN_UINT8   MAX_UINT8  0x98      ""
    FORMAT_STRING "0x%2X"
  APPEND_PARAMETER    DEST_IP   144  STRING "127.0.0.1"                      "Destination IP, i.e. 172.16.9.112, pc-57"
Enabling Telemetry
The command `0x1880` is needed to enable telemetry. When the cFS receives this command, it starts sending telemetry to the IP address provided via the `DEST_IP` field.
cfs_cmds.txt:
COMMAND CFS NOOP BIG_ENDIAN "NOOP Command"
  # cFS primary header
  APPEND_ID_PARAMETER    STREAM_ID   16   UINT   0x1882      0x1882      0x1882      "Packet Identification"
      FORMAT_STRING "0x%04X"
  APPEND_PARAMETER       SEQUENCE    16   UINT   MIN_UINT16  MAX_UINT16  0xC000      ""
      FORMAT_STRING "0x%04X"
  APPEND_PARAMETER       PKT_LEN     16   UINT   0x0001      0x0001      0x0001      "Packet length"
  # cFS CMD secondary header
  APPEND_PARAMETER       CMD_ID       8   UINT   0           0           0           ""
  APPEND_PARAMETER       CHECKSUM     8   UINT   MIN_UINT8   MAX_UINT8   MIN_UINT8   ""

COMMAND CFS RESET BIG_ENDIAN "Reset Counters Command"
  APPEND_ID_PARAMETER    STREAM_ID   16   UINT   0x1882      0x1882      0x1882      "Packet Identification"
      FORMAT_STRING "0x%04X"
  APPEND_PARAMETER       SEQUENCE    16   UINT   MIN_UINT16  MAX_UINT16  0xC000      ""
      FORMAT_STRING "0x%04X"
  APPEND_PARAMETER       PKT_LEN     16   UINT   0x0001      0x0001      0x0001      "Packet length"
  APPEND_PARAMETER       CMD_ID       8   UINT   1           1           1           ""
  APPEND_PARAMETER       CHECKSUM     8   UINT   MIN_UINT8   MAX_UINT8   MIN_UINT8   ""

COMMAND CFS PROCESS BIG_ENDIAN "Process Command"
  APPEND_ID_PARAMETER    STREAM_ID   16   UINT   0x1882      0x1882      0x1882      "Packet Identification"
      FORMAT_STRING "0x%04X"
  APPEND_PARAMETER       SEQUENCE    16   UINT   MIN_UINT16  MAX_UINT16  0xC000      ""
      FORMAT_STRING "0x%04X"
  APPEND_PARAMETER       PKT_LEN     16   UINT   0x0001      0x0001      0x0001      "Packet length"
  APPEND_PARAMETER       CMD_ID       8   UINT   2           2           2           ""
  APPEND_PARAMETER       CHECKSUM     8   UINT   MIN_UINT8   MAX_UINT8   MIN_UINT8   ""
cfs_tlm.txt:
TELEMETRY CFS HK BIG_ENDIAN "housekeeping telemetry"
  #                NAME       BITS  TYPE    ID      DESCRIPTION
  APPEND_ID_ITEM   STREAM_ID   16   UINT    0x0883  "Stream ID"
    FORMAT_STRING "0x%04X"
  APPEND_ITEM      SEQUENCE    16   UINT            "Packet Sequence"
    FORMAT_STRING "0x%04X"
  APPEND_ITEM      PKT_LEN     16   UINT            "Length of the packet"
  # telemetry secondary header
  APPEND_ITEM      SECONDS     32   UINT            ""
        UNITS Seconds sec
  APPEND_ITEM      SUBSECS     16   UINT            ""
        UNITS Milliseconds ms
  # some bytes not known for what
  APPEND_ITEM      SPARE2ALIGN 32   UINT            "Spares"
  # payload
  APPEND_ITEM      CMD_ERRS     8   UINT            "Command Error Counter"
  APPEND_ITEM      CMD_CNT      8   UINT            "Command Counter"
  # spare / alignment
  APPEND_ITEM      SPARE       16   UINT            "Spares"
Build the plugin from the base of your plugin folder:
# cd cosmos-cfs
$PATH_TO_COSMOS/cosmos-control.sh cosmos rake build VERSION=1.0.0
Plugin versioning
Do not forget to change the version number with every build if you want to better distinguish between the versions of the plugin. When the version is seen in the plugin's .gem file name, it is easier to visualize the existing versions and the newly uploaded versions.
Plugin parameters
Multiple parameters are available for the plugin configuration. See the plugin page.
Uploading the plugin
After the plugin has been built, you can import the plugin in the admin area of the page.
Connect with a browser to http://localhost:2900/tools/admin.
Click on the clip icon and navigate to where your plugin is stored and select
the cosmos-cfs-1.0.0.xxx.gem file. Right of the selection line click on UPLOAD.
Determine the IP address the cFS container and COSMOS operator container are running at:
docker network ls
NETWORK ID     NAME             DRIVER    SCOPE
d842f813f1c7   cosmos_default   bridge    local

docker network inspect cosmos_default
[
    {
        "Name": "cosmos_default",
        ...
        "Containers": {
            "03cb6bf1b27c631fad1366e9342aeaa5b80f458a437195e4a95e674bb5f5983d": {
                "Name": "cfs",
                "IPv4Address": "172.20.0.9/16",
            },
            "ceb9ea99b00849fd8867dcd1646838fef3471f7d64b69014703dbedbcc8147fc": {
                "Name": "cosmos_cosmos-operator_1",
                "IPv4Address": "172.20.0.8/16",
            }
        }
        ...
    }
]
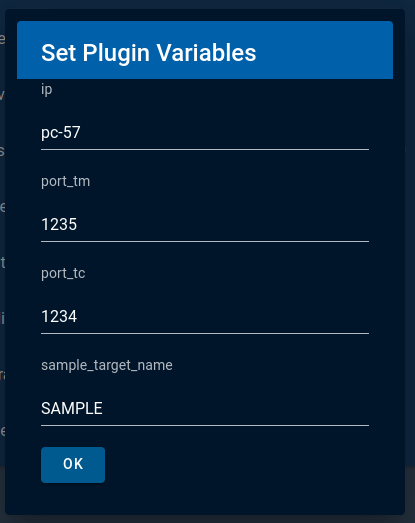
When using this plugin, make sure to change the ip variable during uploading
to match where cFS is running. In the example above you would set it to 172.20.0.9.
port_tm is the port number on which cFS is sending the telemetry messages.
port_tc indicates the port on cFS is listening for telecommands.
Under cfs_target_name you can change the target name of this plugin. This
step is optional as long as you are fine with your plugin showing up as CFS.
Port subscription
The last uploaded plugin on COSMOS will subscribe to TM on port 1235. Other plugins will not receive any TM anymore.
Typo errors
Presence of typos in one of the plugin files can cause problems when uploading and installing the plugin's .gem file. Make sure your configuration is typo-free.
In the example above, the operator image is running at 172.20.0.8. To enable telemetry, go to the browser and connect to
http://localhost:2900/tools/cmdsender/CFS/TO_LAB_ENABLE. Change the DEST_IP to the IP address of the operator image (172.20.0.8) and send the command.
Under http://localhost:2900/tools/cmdtlmserver/tlm-packets, you should see the incoming packets. Note in the CmdTlmServer you will also see CFS_INT UNKNOWN packets because we did not define the full cFS packet set. That exercise is left to the reader.